DIY Faux Arched Fireplace - The Alternative Media Console
Does anyone else dream about a reading a good book while getting cozy in front of a fireplace?
I sure do, I just wish I had a fireplace... 😭 Not all of us are lucky enough to have a real fireplace in our home, but If you can't have the real thing, then simply make it yourself! ✨
This DIY Diary was such a bucket list build. In collaboration with my friend Alexandra Gater, we helped our friend Kali who was challenged with a long/narrow shaped apartment. Kali recruited Alexandra and I to transform this awkward layout and make it into the space of her dreams. Alexandra covered the decor and styling, while I focused on replacing Kali's current TV stand and record player area. This alternative media console gave this room a functional AND beautiful focal point that added SO MUCH coziness and charm. ✨😍
Kali was using an old desk as her TV stand and it worked...but it wasn't pretty nor was it serving the style she aspired to. She also had no place for her record player and all this had to change!
THE BEFORE:

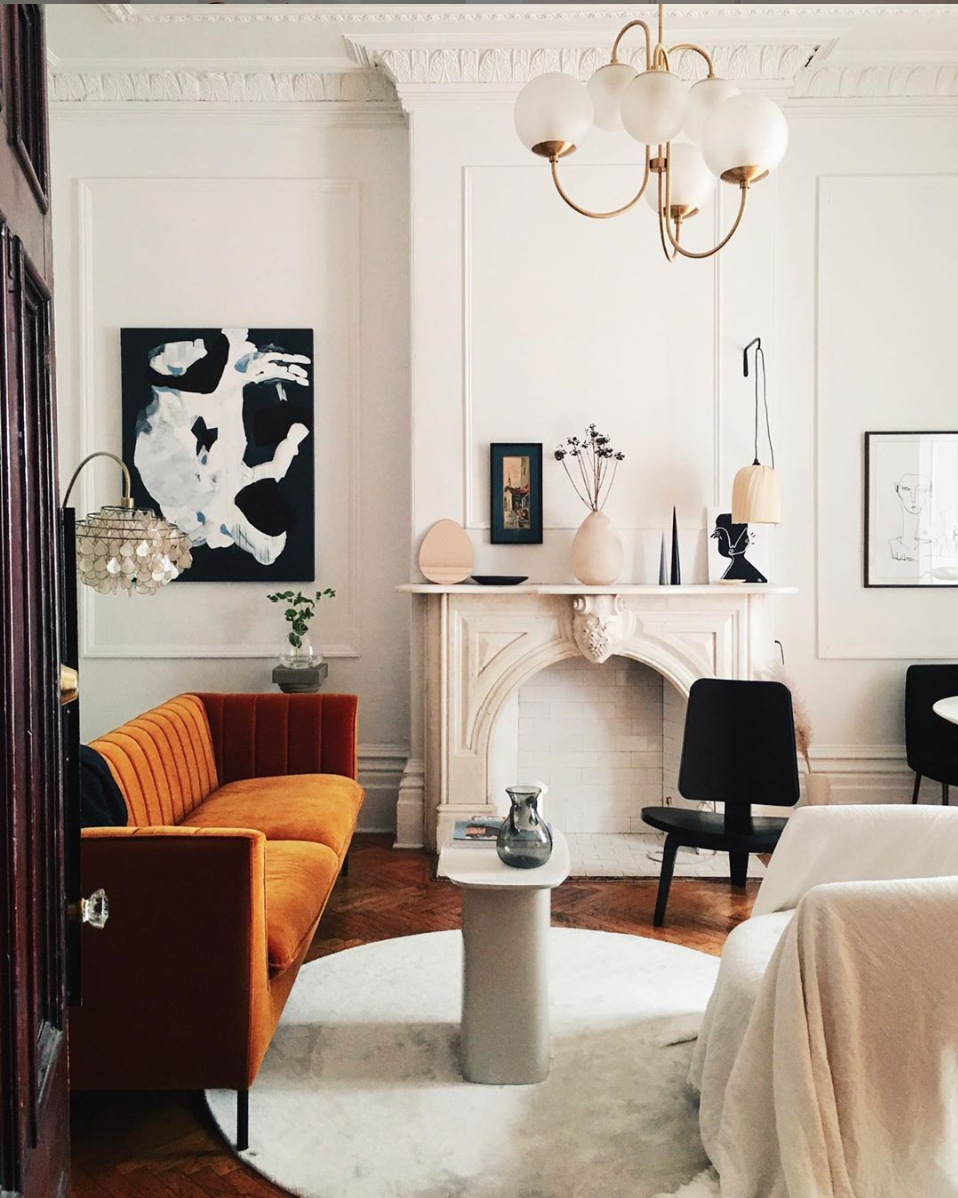
When Kali shared her inspiration photo of her dream living room, it had a beautiful arched fireplace in the back. Once I saw this, I knew I had to create a faux fireplace that was going to give this space so much magic and function.
Photo by: @livingbylo
THE AFTER:

TOOLS USEDWOOD + BUILDING MATERIALSWOOD CUTS
Measuring Tape
Chop Saw
Table Saw (or Circular Saw)
Drill
1/8" drill bit (Pre Drill)Brad Nailer
(4) 2x4 boards (ripped into 2x2)
(1) 4x8 5/8" MDF Sheet
Wood Glue
Wood Filler
220 Sanding Paper
8 x 2 1/2" wood screw
8 x 1 1/2" wood screws
2" brad nails
1" brad nails
Ornate Decorative Elements (of your choosing)
Primer/Sealer Spray
White Paint/Primer
Paint Brush
Small Paint Roller
2x2 cuts:
8 @ 42"
12 @ 12"
12 @ 9 3/4"
3 @ 26 1/4
MDF Sheets:
(2) 16x55 (top and bottom)
(4) 15x42 (sides)
(1) 42x53 (front)
THE SKETCH

THE DIARY,
First things first, I needed to create my plan. I went with a 4x8 ⅝” MDF sheet as the exterior of my fireplace and 2x2 lumber to create the frame. *See cut list above
*always understand when you’re looking up board sizes, you need to take common nomenclature into account. When I say 2x2, the board isn’t a true 2” piece, it’s actually 1.5. Always make sure to check the true size of your lumber before beginning to work out your dimensions!

TIP: While at the hardware store, I got all my mdf cuts done which saved me a lot of time and allowed all the boards to fit in my little hatchback...which at this point feels like a tardis because I'm convinced it’s bigger on the inside. 🤓
Most hardware stores won't rip boards for you, so all the 2x4 pieces had to be cut at home using my table saw. If you don't have a table saw, you can simply use a circular saw with a guide....or just ask a friend with a table saw to cut if for you. CALL IN THAT FAVOR!
Next I had to cut all the 2x2 pieces into their needed sizes using a chop saw:
8 @ 42"
3 @ 26 1/4
12 @ 12"
12 @ 9 3/4"

LET'S BUILD A FRAME!
The first thing I built was my under frame. I took two 42” pieces and assembled the 12” pieces in between using wood glue and two screws. Make sure to pre-drill your holes first to avoid splitting your wood. I positioned the three 12" pieces at both ends and one in the middle.

Once I had one built, I simply just had to build three more!
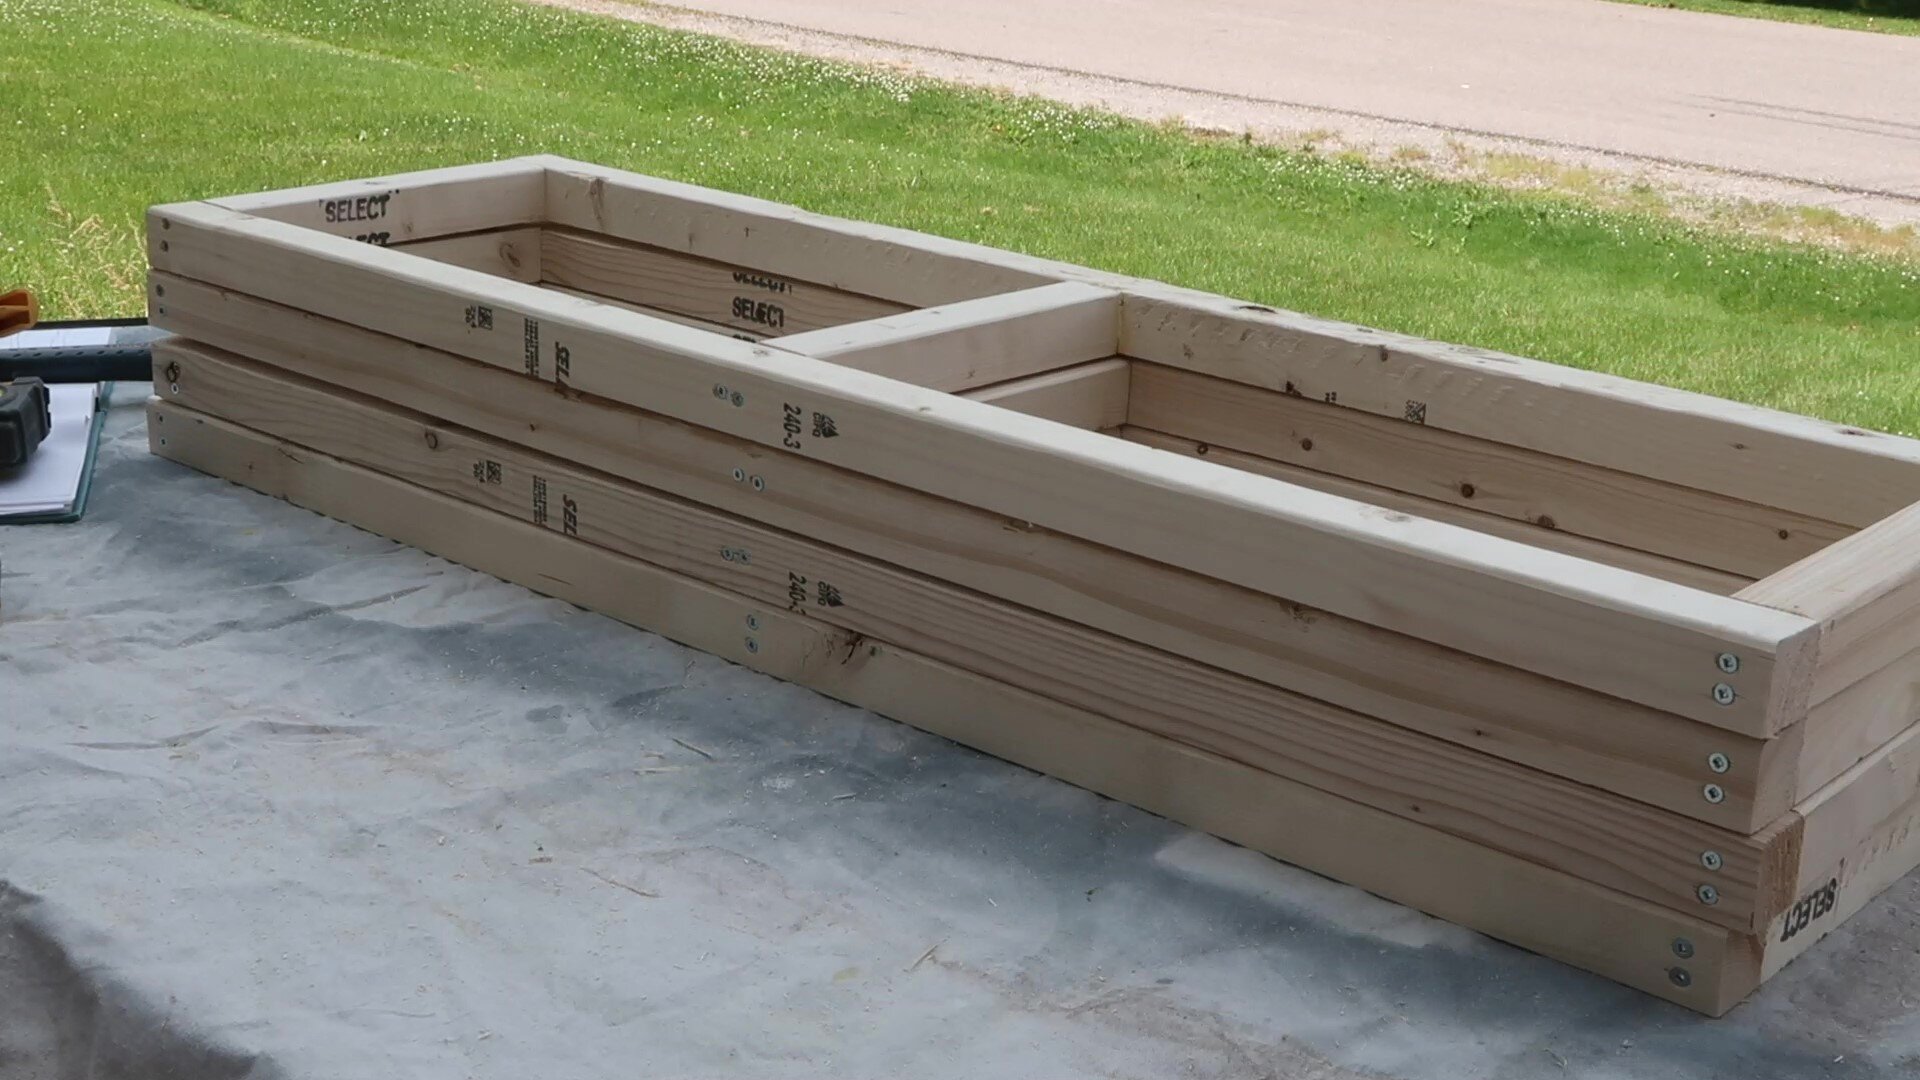
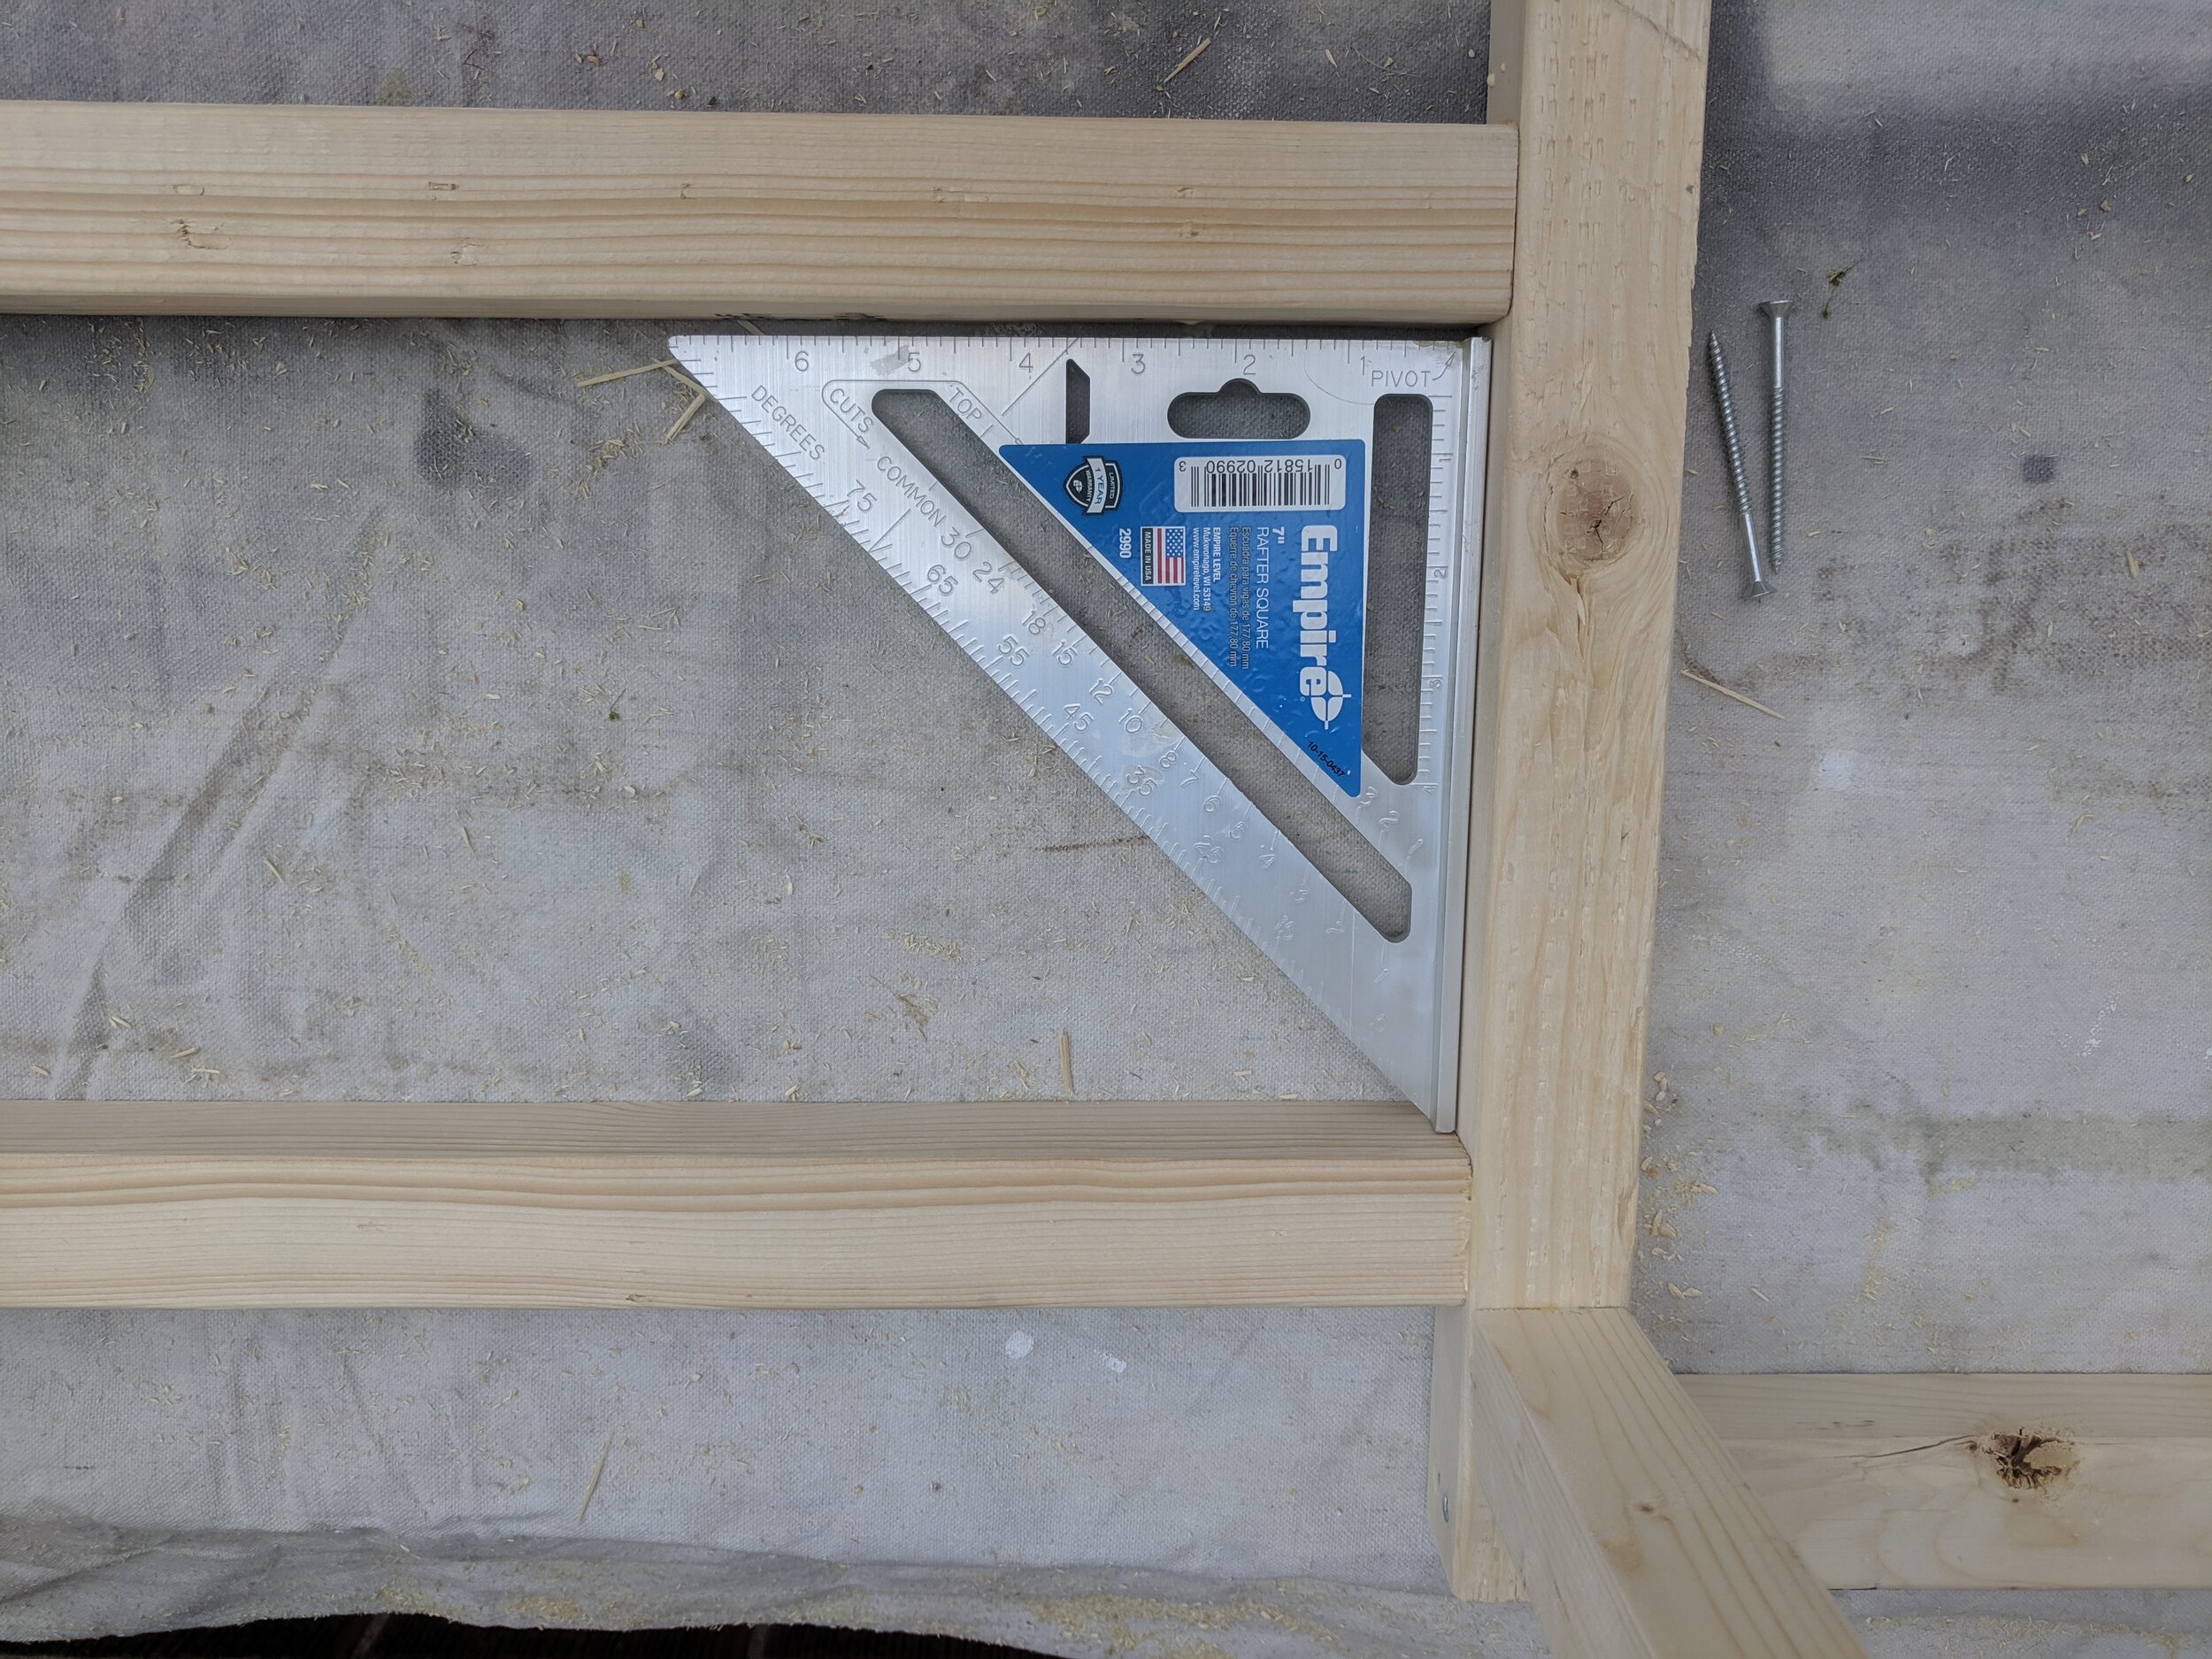
Screw both frames together using the 9 ¾” pieces. For this, I had to be careful not to overlap where my screws were positioned, so I simply placed all the cross joints directly under the pre-existing 2x2 pieces and it solved the problem nicely.

Once both frames were assembled, I used my three 26 1/4" cross braces to connect them together! I used two pieces on the front, using my square as the spacing guide and one in the middle at the back.
At this point it just looked like a frame for a desk but I could start to see the whole project slowly coming together!

ATTACH THE EXTERIOR FRAME
Now onto the more complicated part… the inside MDF pieces needed to be notched to account for the 2x2 braces I had running across. To do that I placed the board sideways and used my pencil to mark where each piece needed to be. Then taking some scrap 2x2 pieces, I used that as my guide and traced around it. Then all I had to do was cut it out my jigsaw.
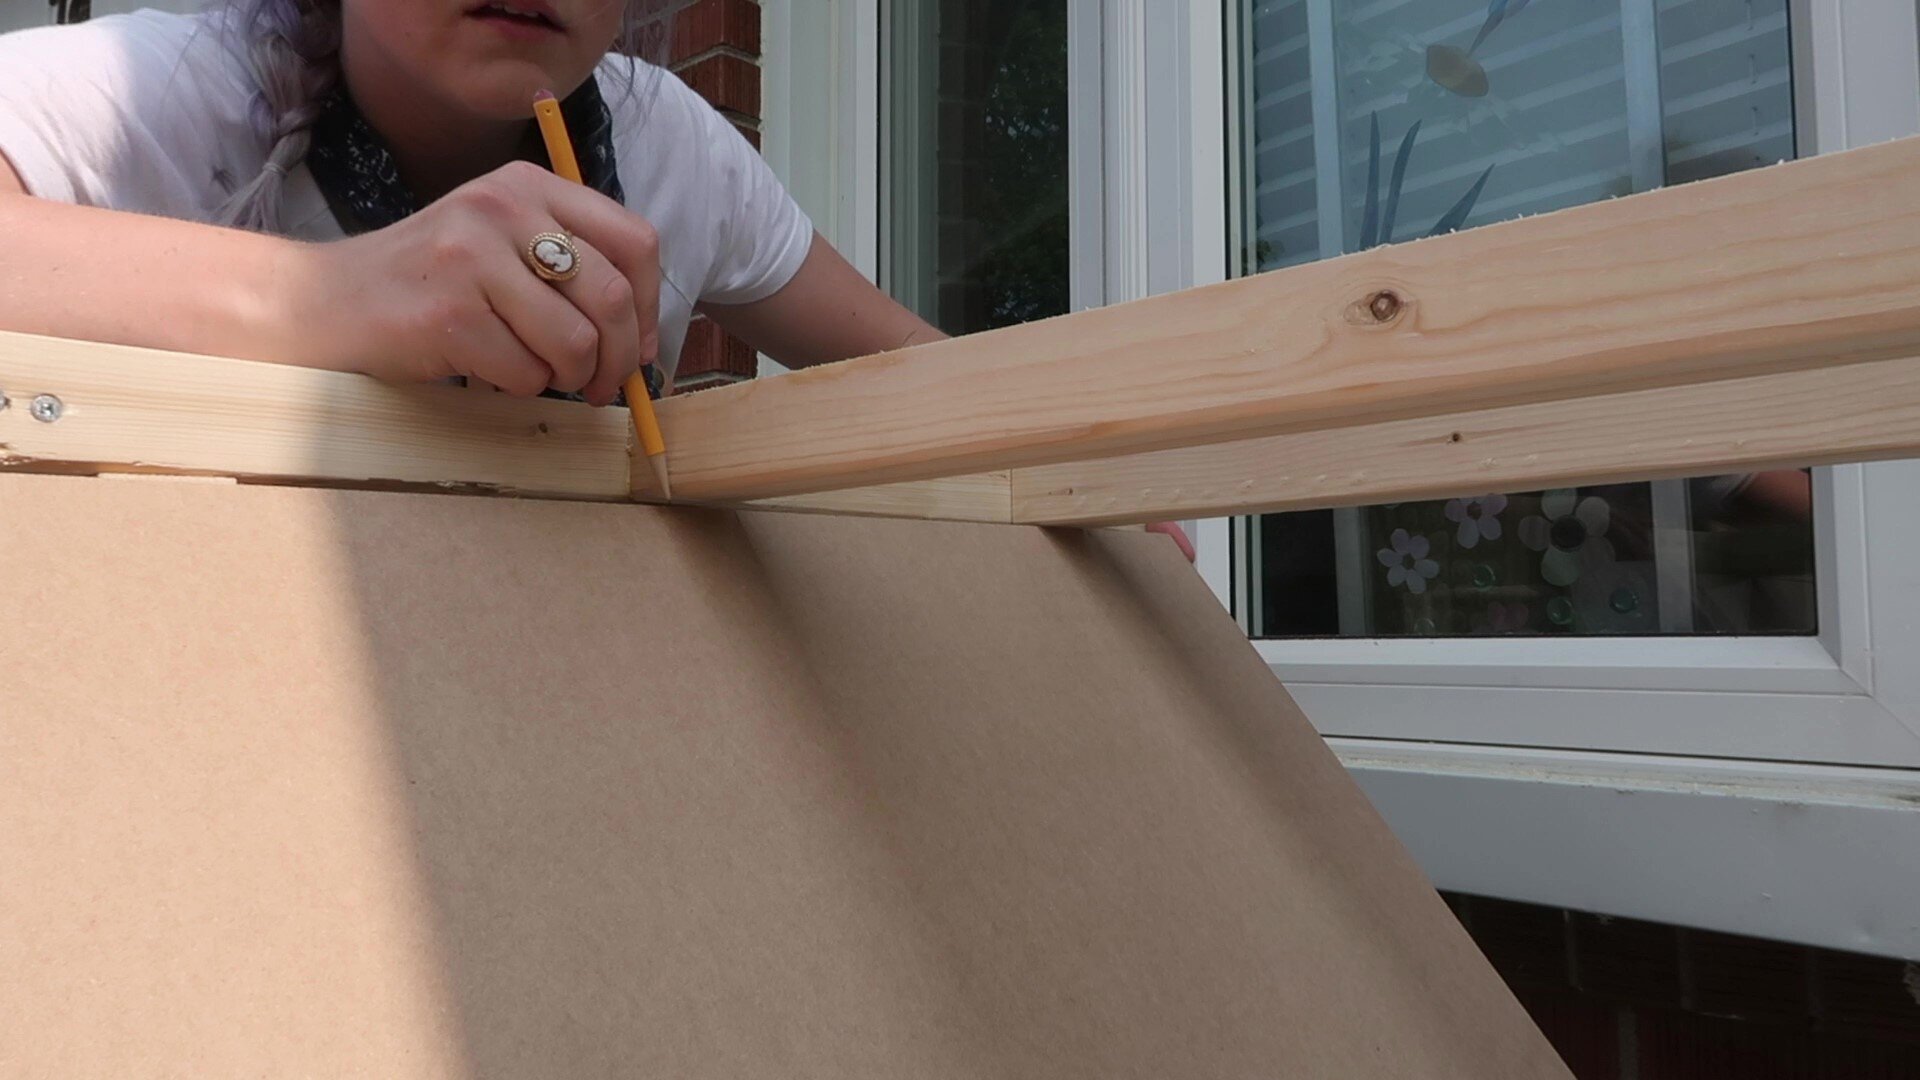
IT FIT LIKE A CHARM. ✨ OH YEAH! So I rinsed and repeated this step on the other side and next thing you I knew, I had two beautiful inside pieces ready to go!
Now all I had to do was attach my exterior MDF board.
To do this, I used wood glue and a brad nailer with 2” brad nails. I love a brad nailer… It's quick and makes the whole process so much faster!
If you don't own a brad nailer, you can simply use finishing nails and a hammer!

TIP: If you are using a softer material like MDF, you need to make sure you turn down the power on the nailer so that it doesn’t shoot the nail all the way through the board! OUCH!
Benefit of using a brad nailer? Cleaning up the small nail holes with wood filler is a lot easier than having to hide screws!
I worked on each side of the fireplace until all my sides were attached.
Then using my palm sander, I sanded down all the edges so they looked uniform and smooth.
THE ARCH
So this wasn’t terrifying at all. I basically had one chance to do this right because I wasn’t going back at this point!
To create the most accurate arch that I could, I measured 14” from the top as the middle point of my arch. I then measured 12.5 inches from each side. The 12.5 inches gets us our center point where we want the arch to be. I drilled through both center points, found two nails and string, and basically made a DIY compass. Pivoting from the 14” point, I pulled the string taught and used the nail to scribe my arch. I then used a straight edge to line up my side and then etched over the line using my pencil so I could see it properly. Last step, I took my jig saw and cut out the arch. PHEW that was really stressful.

As a last step, I used my sander and a 220 grit sand paper and sanded down the arch so it was smoothed out. It wasn’t perfect but it was good enough for me!
ORNATE PIECES
Next I figured out how I wanted to lay out my ornate pieces. I played with a lot of different patterns until I finally landed on a look I was happy with, but all in all, I think it looked pretty cool!
To attach the pieces, I used a brad nailer and 1” brad nails.

Now all i had to do was attach the bottom and top pieces. For the bottom I used 1 ½” wood screws and the top I simply used 2” brad nails and wood glue.


At this point it was starting to get dark and the bugs were coming out.... so as a last step, I sprayed all the MDF exposed edges with a sealant to make sure it was ready for painting the next day and filled in all my nail hole with wood fill.
Basically MDF is condensed sawdust binded up with glue and has been tightly packed together to create a material. The edges are very pourous and can be a nightmare to paint, so I suggest you use some kind of sealent on it to help with this.
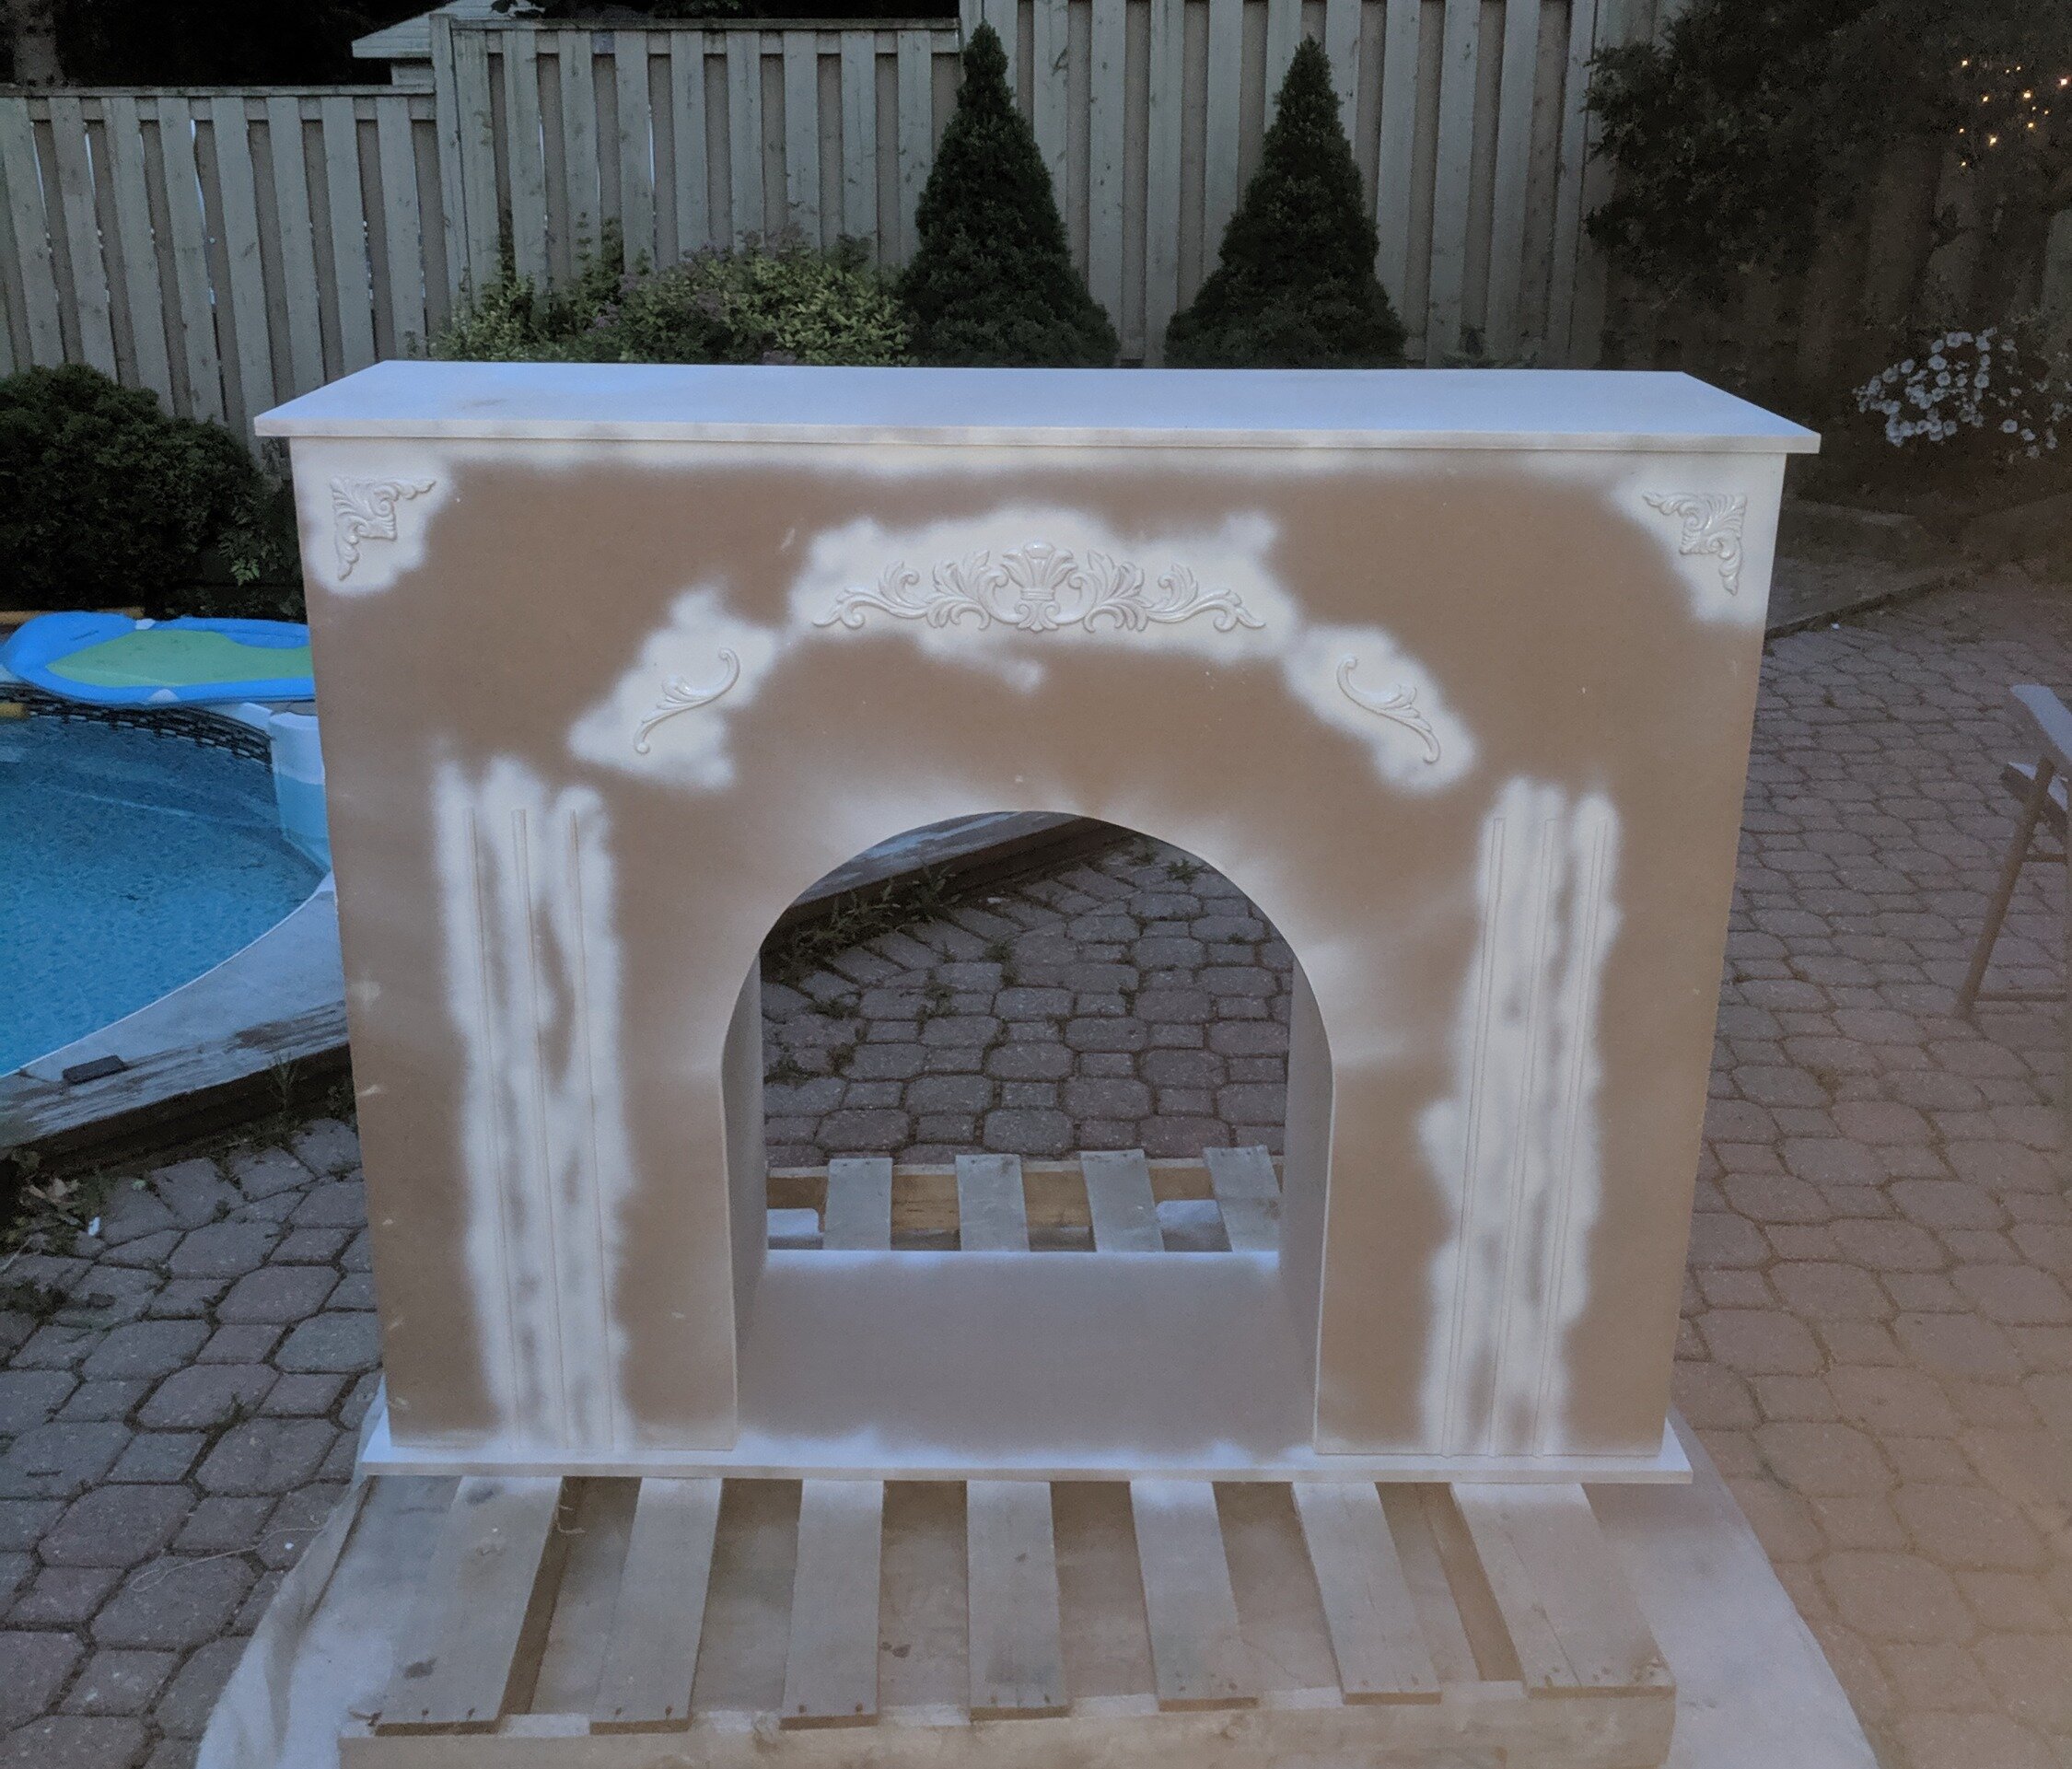
THE PAINTING
LAST DAY! I was ready to fully paint this piece, so I set up the fireplace in the garage and got to it.
I used a white paint and primer in one. I started with a paint roller to cover as much surface area as I could and finished with a small brush around the edges and ornate pieces.
I did about 3 coats in total and VOILAAAAAAAA!!!

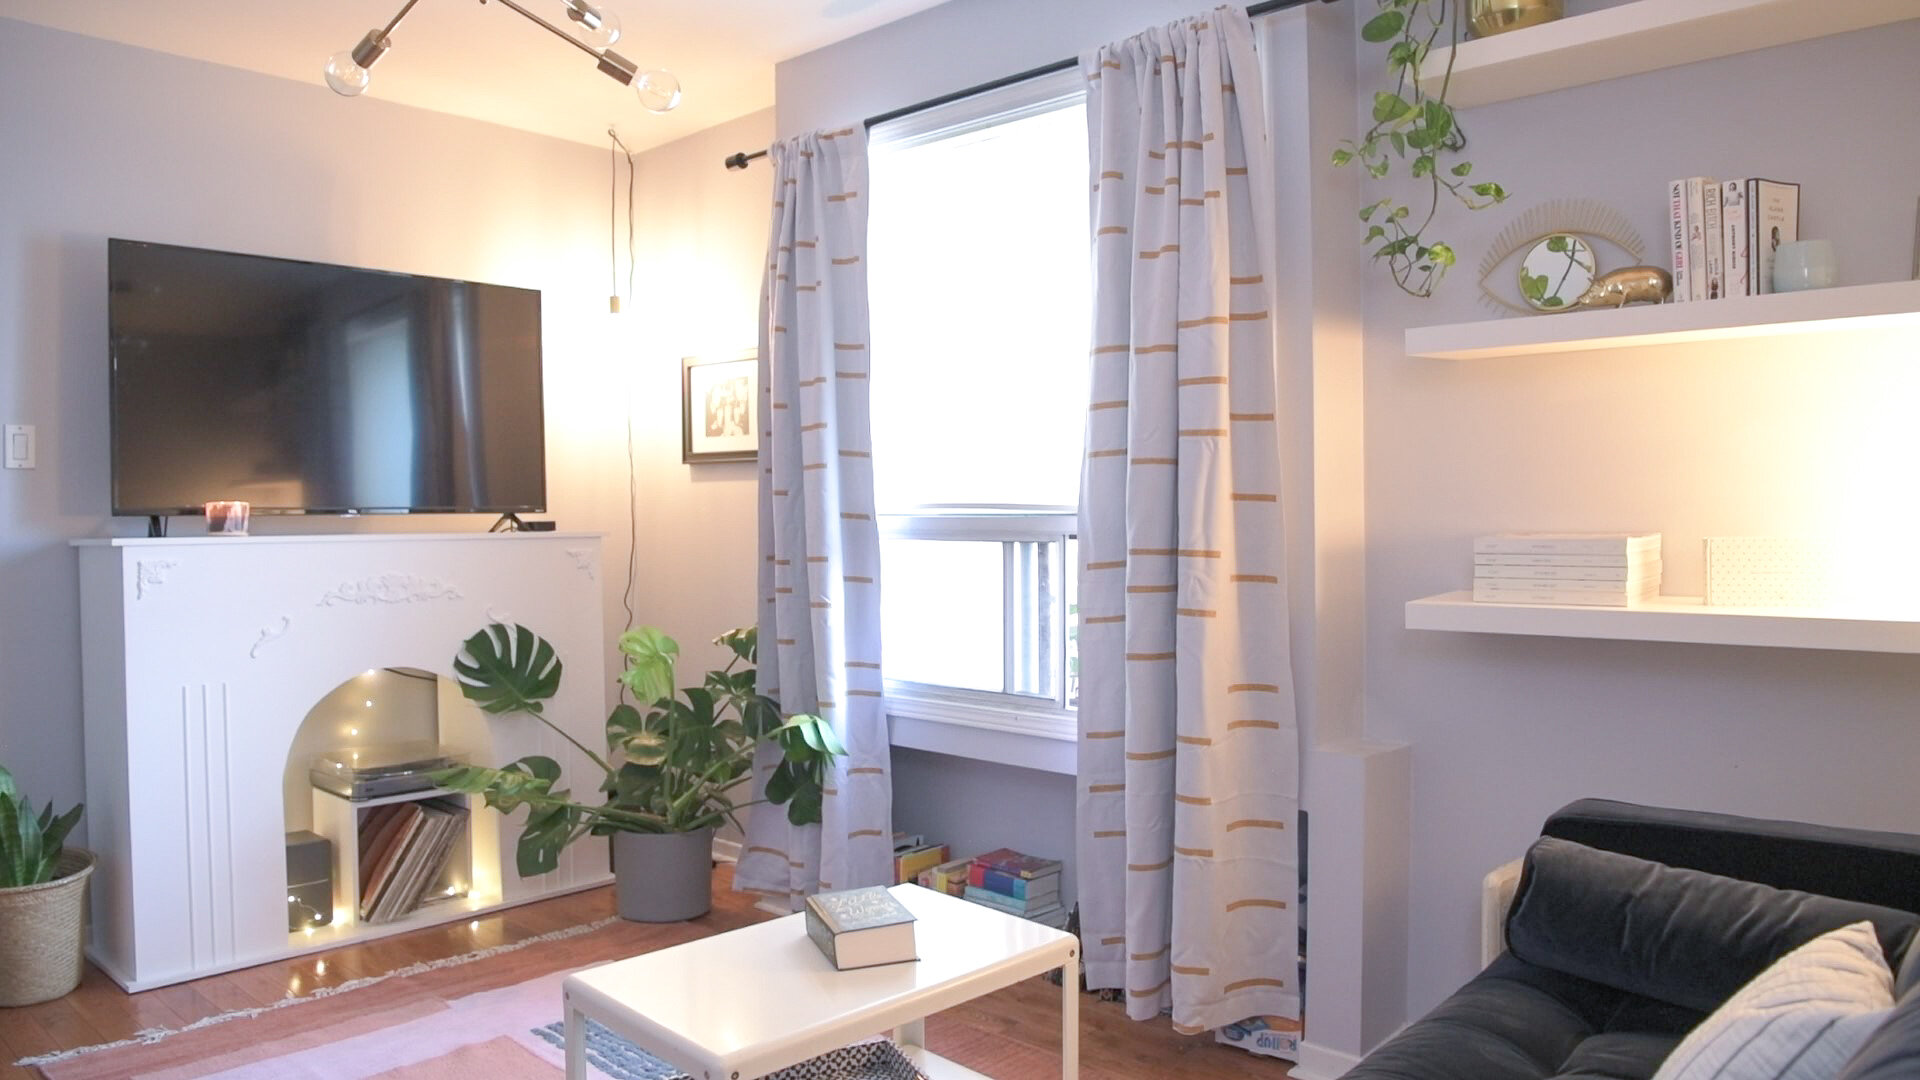
THE FINAL RESULT


How amazing did this room turn out? WOW WOW WOW! Together, Alexandra and I turned a dark narrow living room into a bright, beautiful + functional space of Kali’s dream. That fireplace looked SOOO lovely and added so much warmth to the space (metaphorically of course).
Alexandra brought a beautiful open modern look and my fireplace added that touch of old traditional that brought the whole look together. It became the focal piece of the room and really drew the eye in.

would give this project a DIY difficulty rating of 4 out of 5 stars.
I know this one was a bit more time consuming and tool heavy but it wasn’t difficult to build!
TOTAL COST: $168.00
If I had the chance to build this again, I would probably make it much more narrow.
The piece fit the record player perfectly but if it wasn't for that element, I would have made this much more slim in profile.
I'm still happy with the way it turned out and I feel very proud of the way it looked! 😍