How I created a $6000 Apothecary Cabinet for $600 #Ikeahack
If you're anything like me, you read all the big home magazine brands like dominio or AD, drooling over photos of beautifully designed spaces. My reality... most of the items I love will cost me my entire savings! #ForeverWindowShopper. Now, don't get me wrong - you don't need loads of money to make a space beautiful...I'm a total believer that good design can happen anywhere, but sometimes we just really want that $6000 dollar apothecary cabinet in our home! I am forever inspired to find custom budget-friendly solutions to big ticket items we love. If you're on a tight budget, you need to get creative. That is why I love this custom #ikeahack DIY solution. It looks beautiful and saves you mucho dollars!
Don't get me wrong folks, I am aware that Ikea hacks are nothing new to the DIY Space... especially when it comes to apothecary hacks. There are tons of amazing ideas created (big and small) and I'm sure many are similar to this one..but I hope my version is just as worthy and inspires you to DIY the home of your dreams ✨
DEAR DIY DIARY,
This diy solution started when my friend Jess reached out looking for a custom, budget-friendly solution to an apothecary cabinet she saw online. Jess loved the large drawers and warm wood tone. After seeing this image, I also fell in love with it.
(THIS ONE) by Amber Interiors Design

THE IDEA
I quickly put my "DIY thinking cap" on and we decided an IKEA hack was the easiest and most affordable way to go. The plan was to use two Ikea 6-drawer Tarva units, sold for $199 each. I loved these units because there was no defined edges on the sides, which made it easy to place two side-by-side, and you could purchase it in untreated solid wood. Easy to stain or paint!

Starting with two of these as my general frame, I pitched two different options to Jess.
One that mimicked the original inspiration photo and one that felt more traditional to the apothecary vibe.
OPTION1:

OPTION 2:

Jess felt option 2 was more in line with her inspiration, so we had a plan to move forward with!
HEIGH-HO, HEIGH HO, IT'S OFF TO IKEA I GO!
low key... I love trips to Ikea. I wish more home stores created small vignettes to show off their products. It's always so inspiring to see their items set up in different ways. It always gives me inspiration for my DIY's and I almost never leave empty handed 😅

TIME TO BUILD
I'm not sure how many of you have noticed but I don't live in a big home. It wasn't long before my small living room space was being attacked by two Ikea dressers! Moving forward I had to be conscious about space if I planned to stain both pieces in one go....
To save on space, my plan was to assemble both dresser bodies but leave the drawers unassembled because obviously, those were going to need to be hacked later.
I'm not going to lie... building these two units was a severe undertaking all by myself. I had kenobi routing for me on the sidelines, but it took a solid 3.5 hours to get through it all. Honestly, Ikea building could be its own olympic sport. If I ever tackled this again in the future, I'm just going to pay someone else to do. For real though... #thestrugglewasreal #taskrabbit

Next step was to hack the drawer fronts. This is a lot more simple than you think. All you need is measuring tape, a triangle, a straight edge, hand saw and two clamps.
First step, measure and mark the middle of your drawer front. This line is going to be your saw guide line. Then take your straight edge and triangle to make sure it's straight and clamp the straight edge down to the left of the line. (This of course can be on whatever side you need it to be on, depending if you are left or right handed.)


Carefully saw into the drawer front, using the straight edge as a guide to ensure you cut down straight. I only sawed down less than 1/8th of an inch. Once I had my line, I used this to mark the top and bottom edges, scoring the line a few times first to make a groove and then sawed down the same 1/8th depth. By adding the extra gap on the top and bottom, this allowed each faux drawer front to really have a "singular drawer" look. Just make sure you don’t saw down too much because you don’t want your drawer front to lose its structural integrity.


TIP: Once you finish the first drawer, use this sawed line placement to mark the line placement on the next drawer front. This will ensure the drawer lines up properly on the finished dresser. If all fails, you really you only need to match three drawers at a time, and ensure they are matched together later.
STAIN

To stain my apothecary cabinet, I used a gel stain by Old Masters called "Dark Walnut" .
I like working with gel stains, it's a much easier product to use when you're moving around in a small space and you get more bang for your buck. It’s more expensive but you use way less.
This stain is oil based, so it will take a little longer to dry (24 hours or more) but the color finish is beautiful.
To apply the stain, I found it faster to use a sponge to apply and wipe away with a cotton rag. The sponge allowed me to cover more surface area in a short amount of time... and I had a lot of surface area to cover. I think all the pieces took me a total of 3 hours.
Again, you'll want to make sure you have A LOT of space if you plan to stain both pieces in go sitting. Just make sure you are staining in a well ventilated space and always stain in the direction of the wood grain.

ASSEMBLE THE DRAWERS 😫
I actually think it took me longer to assemble all the drawers than it did to assemble the two bodies. Even the assemble guide book said… "do it with a buddy" (look around) Kenobi?
Yeah, it took awhile… but I got it done and I was finally starting to see the vision come together! It was so exciting!

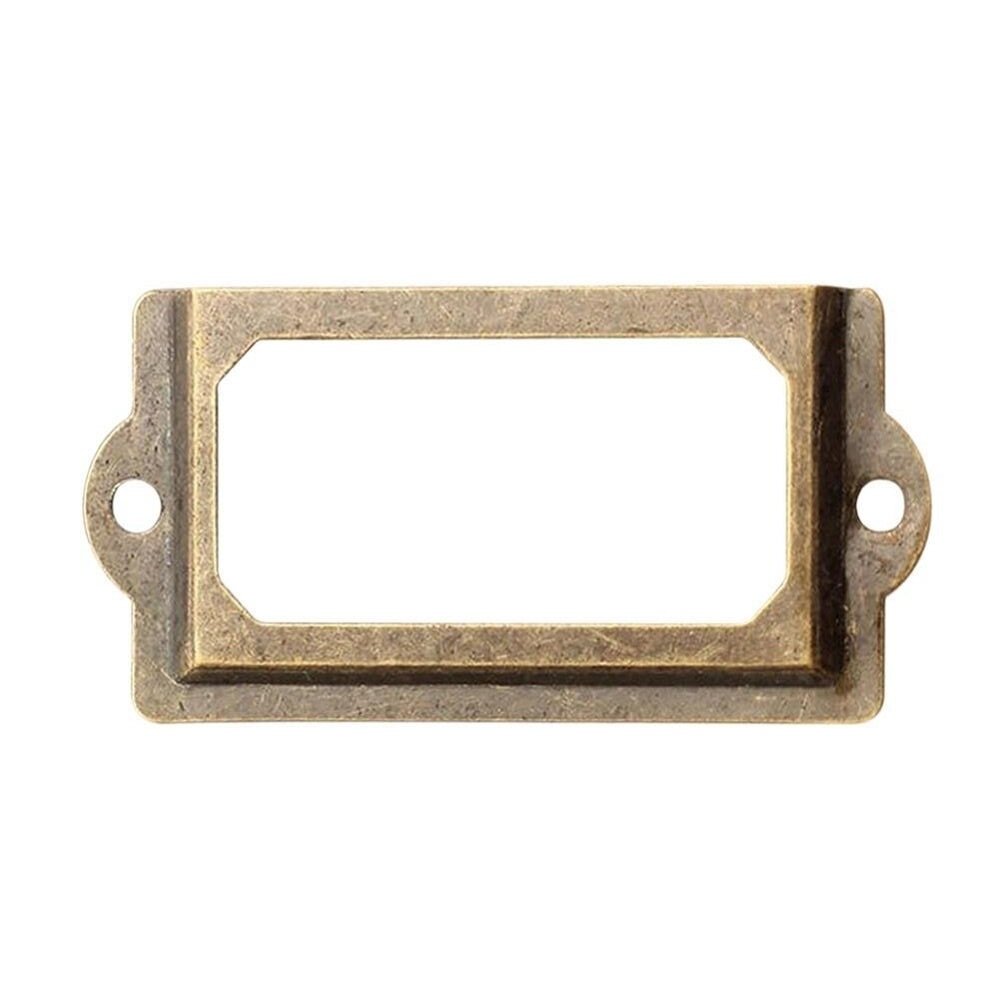
HARDWARE
I sourced two amazing products off of amazon; a brass finished pull and the iconic matching name tag holders.

To attach the pulls, I measured to the center point on the drawer and attached using the packaged screws and a phillips head screwdriver. I was so thrilled these drawer pulls covered the pre-existing holes from the former drawer pulls…
TIP: Make sure you know which hardware you plan to use before you start the staining process. You may need to fill in the pre-existing drawer pull hole with wood filler first!

Once I had the placement of the pulls, I measured the halfway point from the pull to the top of the drawer and attached the tag holder in the middle.
DRESSER TO CABINET - THE REAL GAME CHANGER
Now, there was only one thing left to do and that was to take this from looking like two dressers and transform it into two cabinets. To do that, I sourced two 10 ft 1x6 pine boards and had them cut to the correct lengths to fit in between the fronts and sides. Turns out a 6” board was the perfect size to fit in there (it was meant to be).


Once I had all my pieces fit to size, I drilled pocket holes into the backs of each. The long pieces got three along the top and two on the sides and the small side pieces got two on the sides and one on the top. Might have been over kill but I didn’t want those boards to go anywhere.
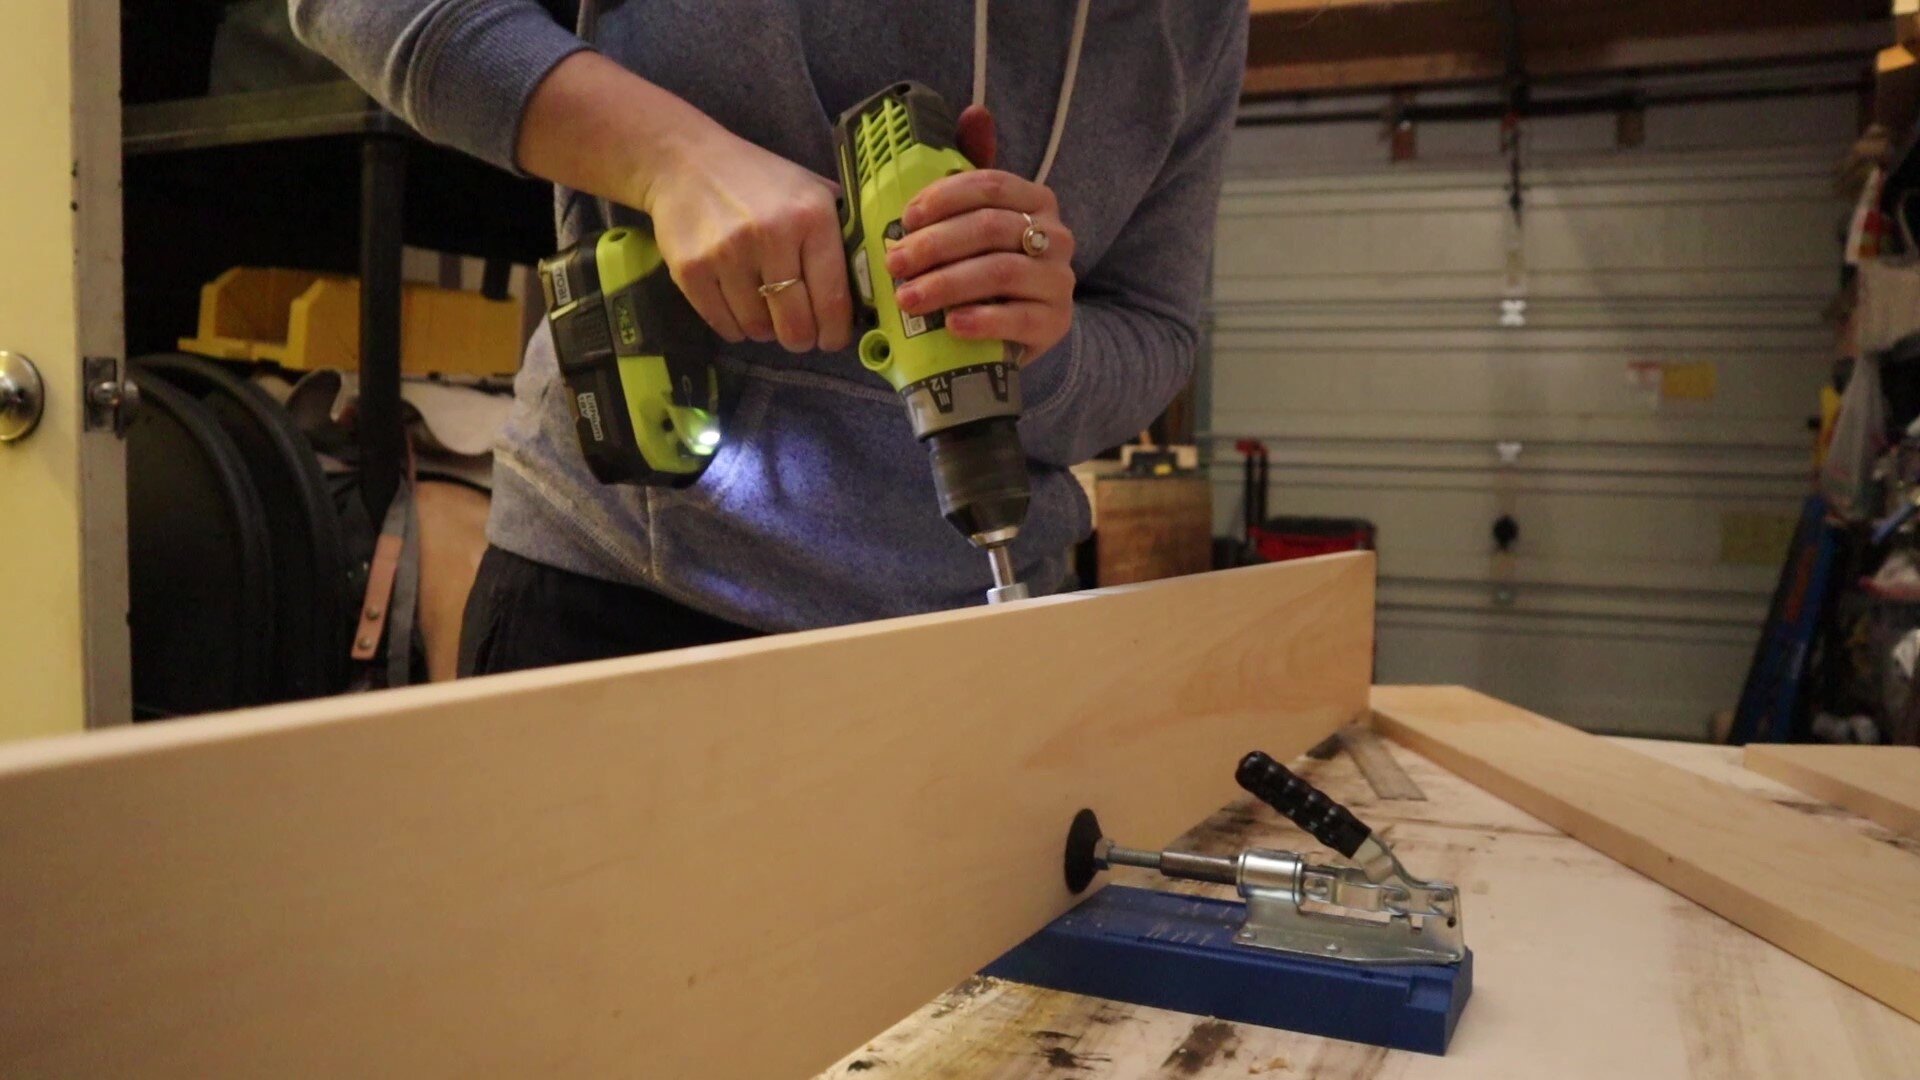
Then I simply stained the boards, let them dry over night and the next day drilled them into place with pocket hole screws.
I chose to add boards on all three sides of each dresser because I wanted to provide Jess with an option to keep each individual faux apothecary cabinet as a stand alone piece, should she move or change her mind on it's placement in the future.
*OPTIONAL FINAL STEP
This step is completely optional, but adding a finish or wax on the surface will provide protection from general scuffing and make this piece look like a million bucks!
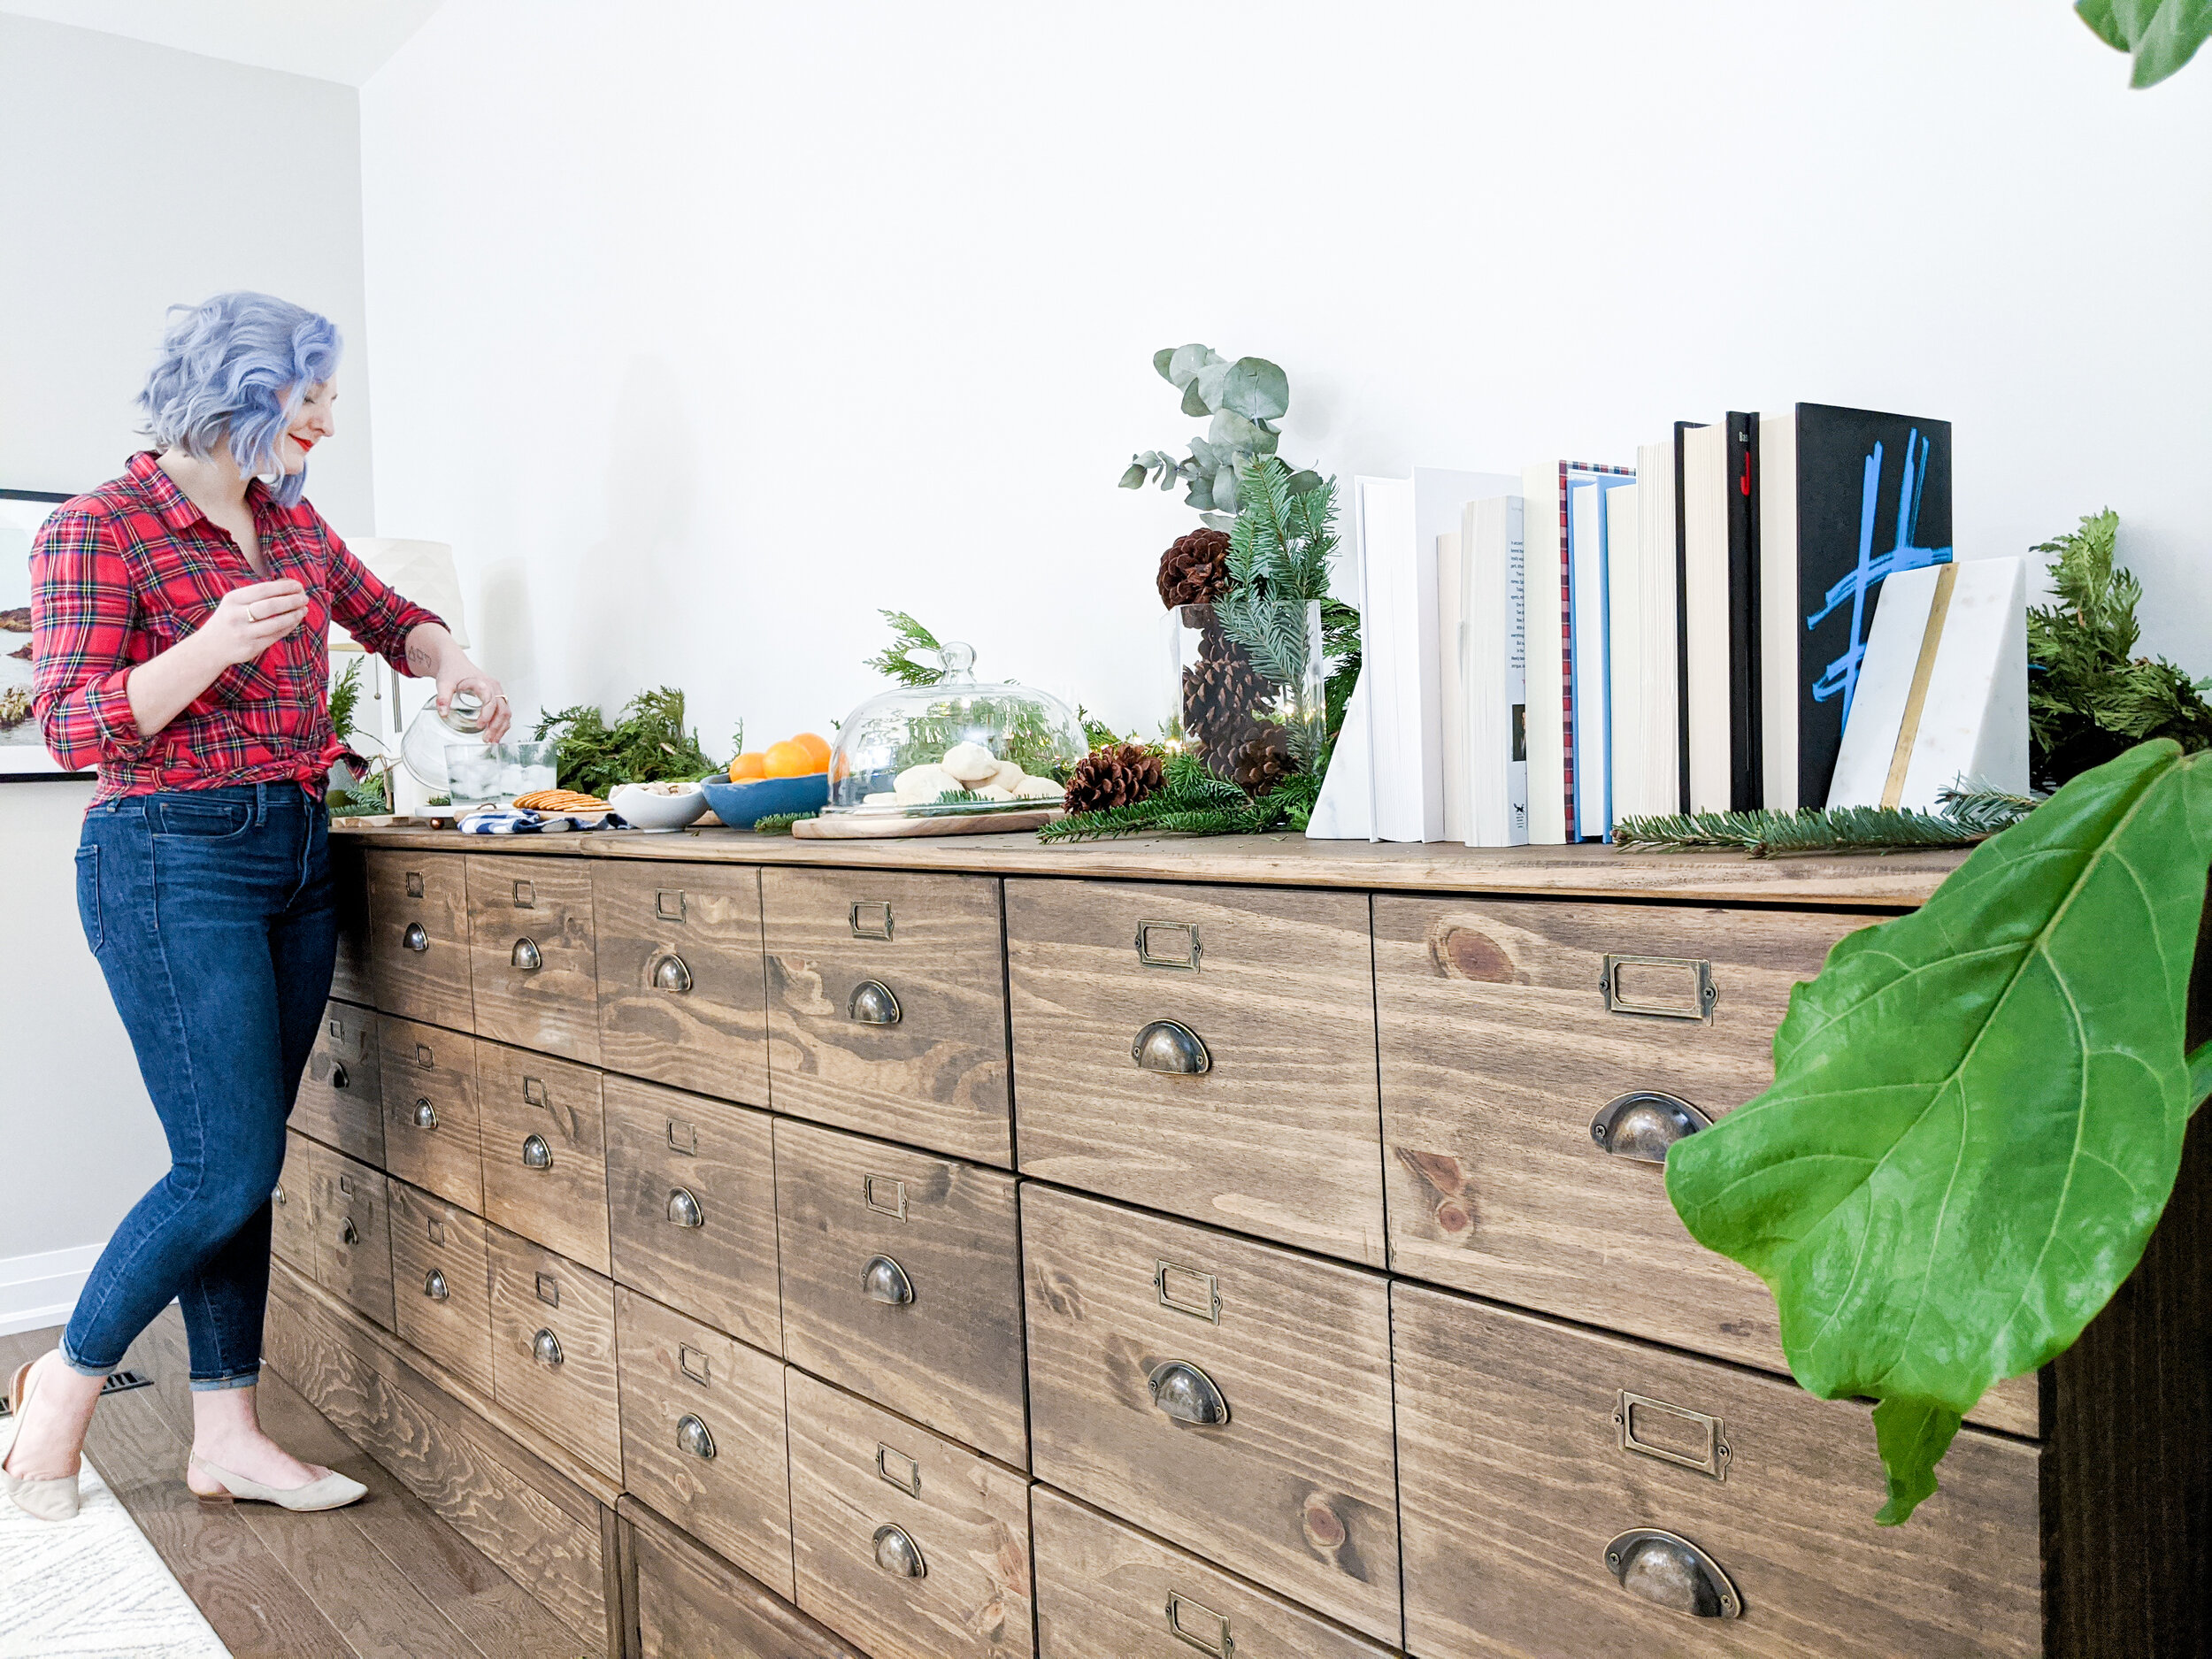
THE FINAL PRODUCT
VOILA! Just like that, I turned two 200 dollar dressers into one $6000 + looking apothecary unit. and if this isn’t the most beautiful IKEA HACK you’ve ever seen, I don't know what is. It was pure magic. ✨
They cabinets really did look like they had 24 individual drawers! And the pulls with the matching name tags looked beautiful and antiqued. I couldn’t be happier with the way this turned out and I know I left with Jess beaming from ear to ear. And that makes all the ikea building worth it.

