
DIY Greenhouse Part 3: Finishing the Exterior and Planting Pretty Flowers
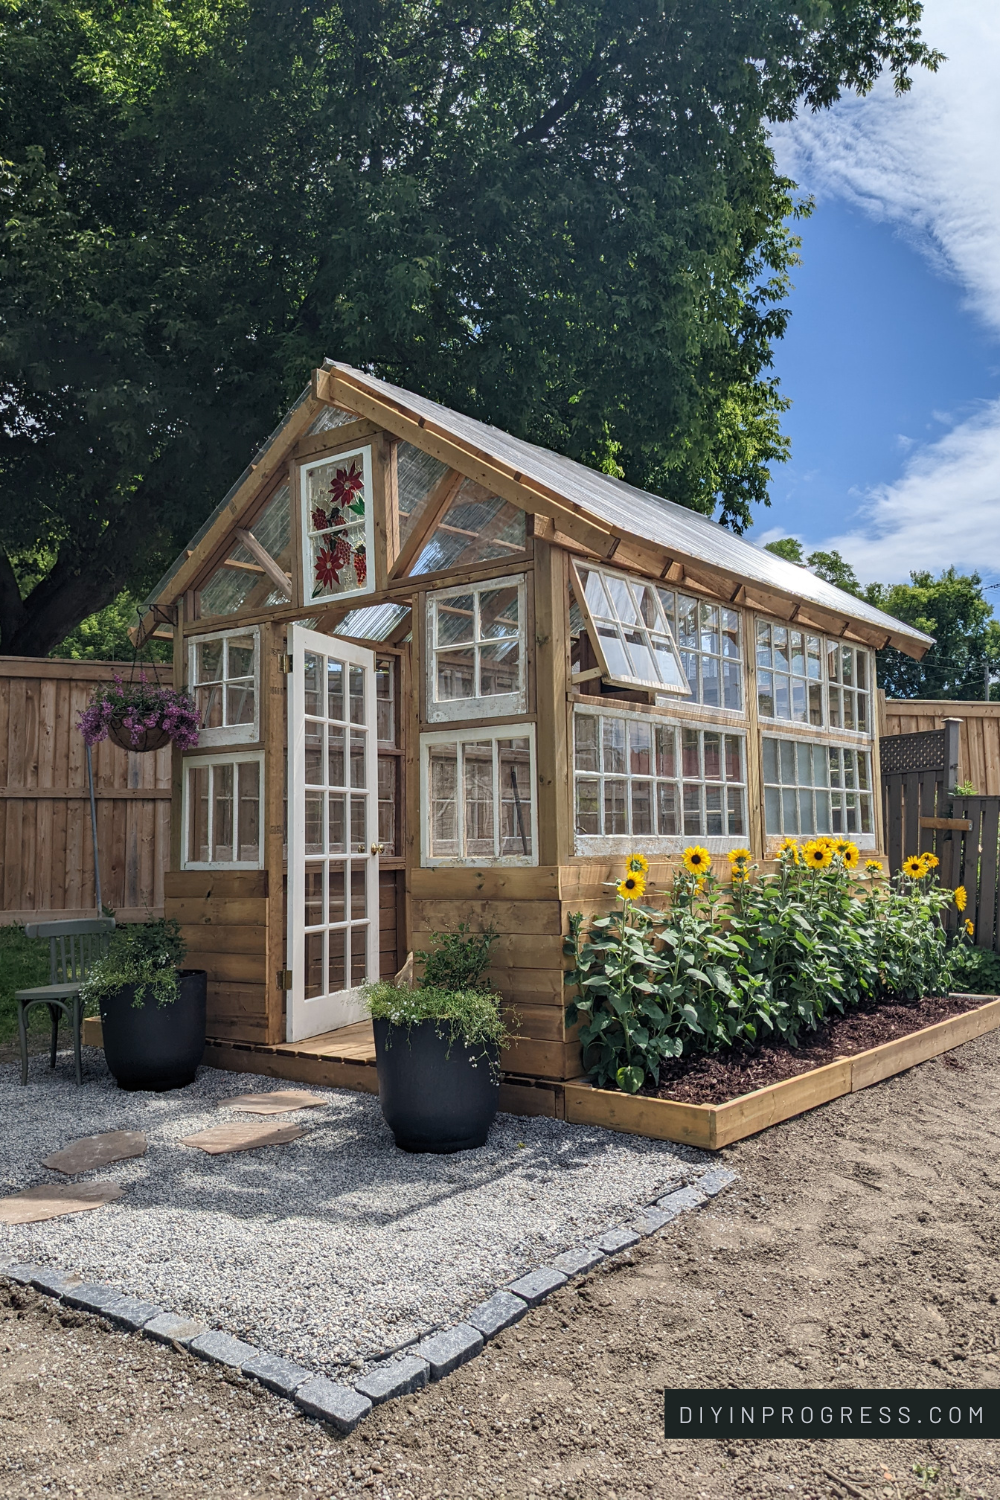
DIY friends! Welcome back to Part 3 of the DIY Greenhouse build! I’m bringing together the finishing touches on the exterior that include adorable stepping stones to the door, a pea gravel pad out front, DIY garden boxes and beautiful garden plants to fill them!
If you're just tuning into this project, I recommend you go and check out Part 1, where I built the foundation and basic greenhouse frame, or Part 2, where we finish the roof, add old windows into the frame and finally insert the reclaimed clawfoot bathtub!
Let's go!
Working on the entrance of the greenhouse
After working so hard to build the greenhouse, I wanted to make sure the exterior looked as charming as the greenhouse itself! I wanted beautiful gardens to hug each side of the house and attract bees that could help pollenate the veggies inside. My goal was to plant perennials on the more shaded side and annuals on the sunny side. I also wanted to create a path in the front using pea gravel and stepping stones.

Starting with the front of the greenhouse, I levelled out the dirt and tamped it down flat. Using landscape edging, I created a defined space then put landscape fabric down to stop any weeds from growing through. From there, I placed adorable stepping stones to make a whimsical pathway to the door of the greenhouse. You can make a pathway out of many different materials, but I liked these asymmetrical stones much better than concrete slab or cinder blocks. Do what feels right for you and your space!
Moving gravel

Next it was time to move a whole lot of pea gravel! Once I had enough inside my defined landscape edged space, I used a metal rake to spread it out evenly around my stepping stones.
I didn’t decide this until later, but I wanted to define the edge of the gravelled area. I thought it would make the space feel more intentional (and pretty) with a border, so I removed some dirt and laid small grey bricks around the perimeter to finish it off.
Building the garden beds
Like I mentioned above, I wanted to make a dedicated space for growing flowers on either side of the greenhouse. I came up with a plan to build a very simple garden using left over PT deck boards, properly line it and fill it with dirt for growing beautiful flowers.
Building material matters for garden beds, and you want to choose lumber that is resistant to rotting. PT has a lot of chemicals in it, so if you use PT, a liner is necessary.

To make my garden beds, I cut (4) 2 ft boards and (4) 6 ft boards from my left over PT boards. I also created 2x2 support posts that would sit in each corner and be the connection points for my 1x6 boards. The 2x2 was cut a foot longer than the height of the 6 ft boards and the ends were cut into a point so I could easily stake them into the ground.

Then, I attached support pieces to the ends of the first short end board and hammered the extra foot of stake into the ground where I wanted the end of the first flower bed to sit. This was a great way to ensure my boxes were secured to the ground and gave me the ability to adjust the height of each board to ensure the whole thing was level. Once the two end pieces were hammered into the ground, I attached the long sides using the stakes as anchor points.

Using a level for this job is a great idea, because your eyes just cannot be trusted. There were many times that my eyes disagreed with the level, but I'm so glad in the end that I trusted my tools. There are many creative ways to build a garden bed, but I was pretty impressed with how quickly and easily this simple design came together.
Even though the wood is pressure treated, it will still be fully covered by damp earth. So, I decided the best option to prevent the boards from rotting out was by covering the inside of the boxes with some plastic sheeting. Any plastic cover or plastic film you have available will work for this. I used left over vapour barrier plastic sheet for my boxes, then used a staple gun to attach it. You don’t need to add plastic for the bottom, as this would prevent your garden from draining properly.

Installing the Gable Ends
The section of windows above the front door is called a gable end, if you want to know! I had a beautiful stained glass window that was special to my family, so I wanted this to be installed directly above the door to be the focal point of the entire house.
First, we trimmed the stained glass window and framed it using 2x4s, much like we did for all the other windows. Then, we had to come up with a solution for the oddly shaped triangle gaps that were left on either side.
To fill in these spaces on each side of the stained glass window, we used a piece of 1/2" clear acrylic sheeting that I had in my stash of building supplies. To hold the acrylic, we used slotted 2x4 that has a small groove that runs down the middle. The acrylic fit perfectly inside and it became the perfect solution!
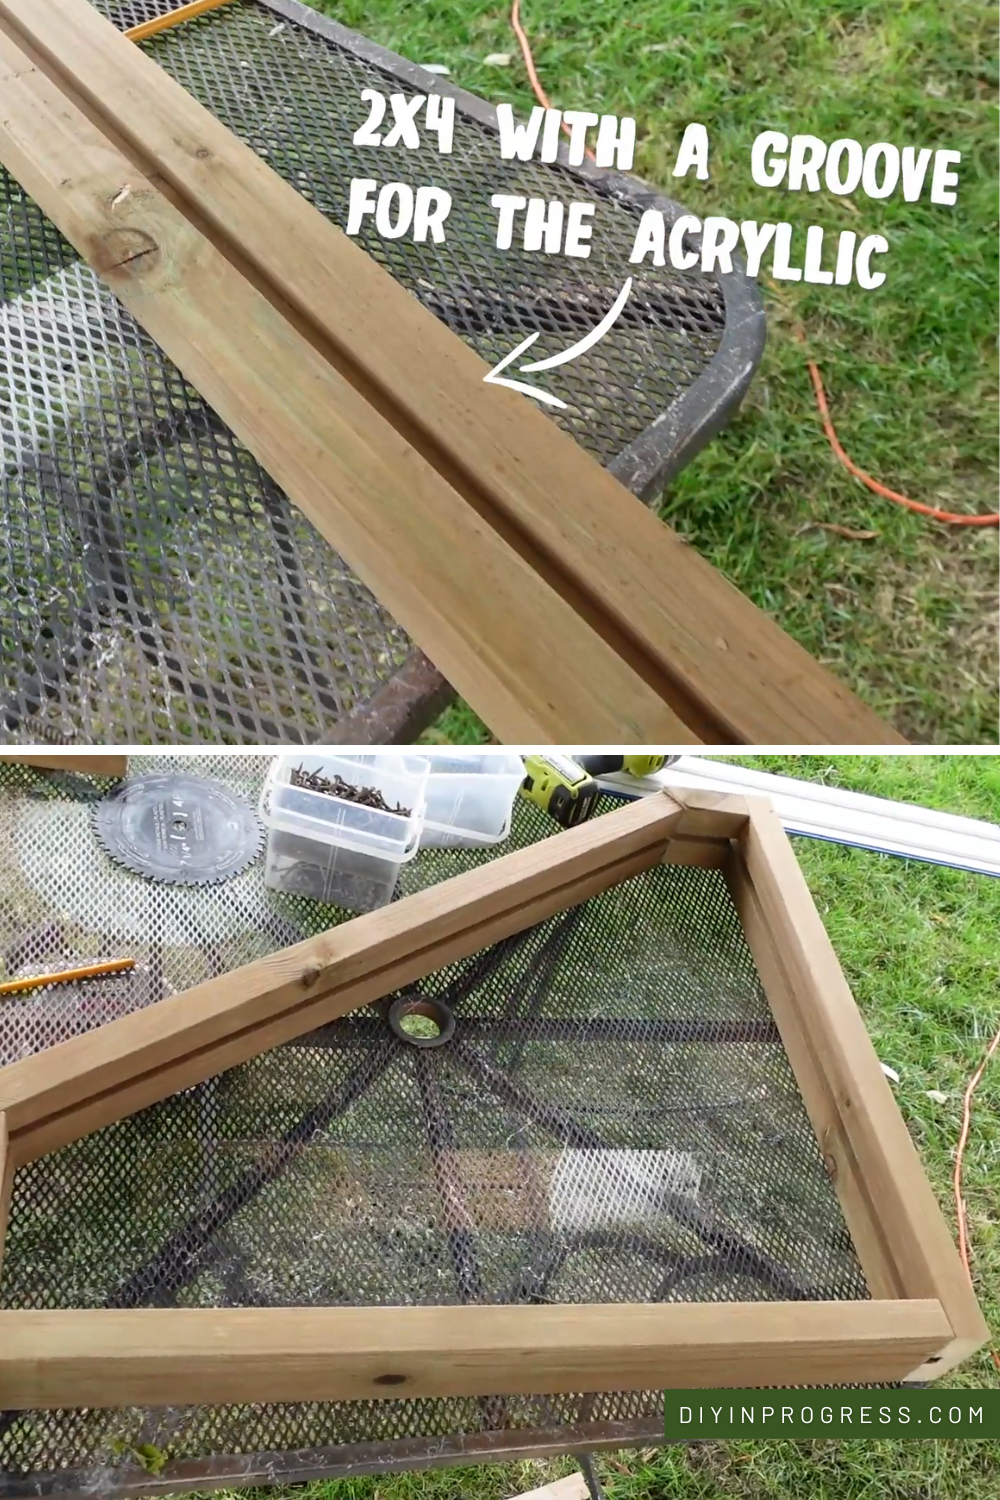
To cut the plastic, we used a special saw blade for composite/plastic cutting so the acrylic wouldn't crack.

For decoration, we added a diagonal bar in the middle on both sides.

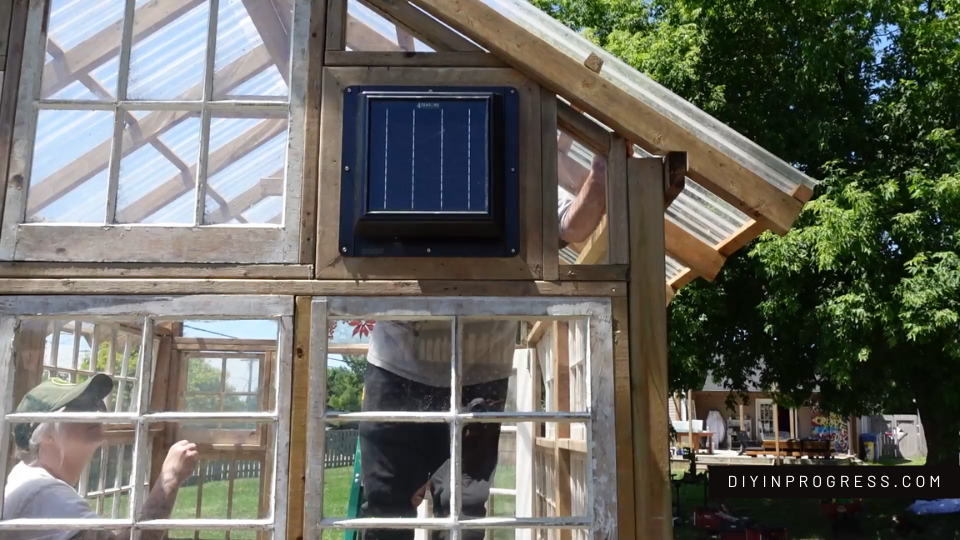
Rear Gable End
For the back wall, I mirrored the same look as the front with a small window in the middle and a smaller window off to the left side, along with a solar fan on the right. The solar fan was purchased to help circulate air in the greenhouse and keep our plants from frying in the heat. Air movement is important, which is why we also added hinges to a few windows in the front so we could prop them open at night when the door was closed.

Gardening
Due to the location of the greenhouse, one side gets a lot of shade and the other receives 100% sun. I decided that the sunny side would be a great place for annuals and I always had visions of sunflowers whenever I pictured the finished result. So when I saw mini-sunflowers on sale at my local grocery store, I was so happy! I bought 8 of them.
The shady side is a great place for perennials that don't require as much sun. My dad gifted me some hydrangeas that I knew would be perfect in this space.

As a final finishing touch, I added hanging baskets to the front and bought two large planters filled with blooms to liven it up!
This greenhouse finally felt like it took on a spirit of its own. A lot of love and hard work was put into it and I could not be more proud of the finished product. I had so much support from my family and friends who all put a piece of themselves into this space. and I think that is the heart of DIY: building the things you love, with the people you love.

