
DIY Greenhouse Part 1: Building the Foundation and Wooden Frame
Hello DIY friends! In case you're new here, I’m Danie! Today’s DIY In Progress was a long-awaited project. I FINALLY built my own greenhouse and I could not be more excited to share this journey. This experience was humbling, exciting, and a true labour of love. Today, I'm going to share all about how we got started: getting the ground ready, collecting building materials, and building the basic greenhouse frame.
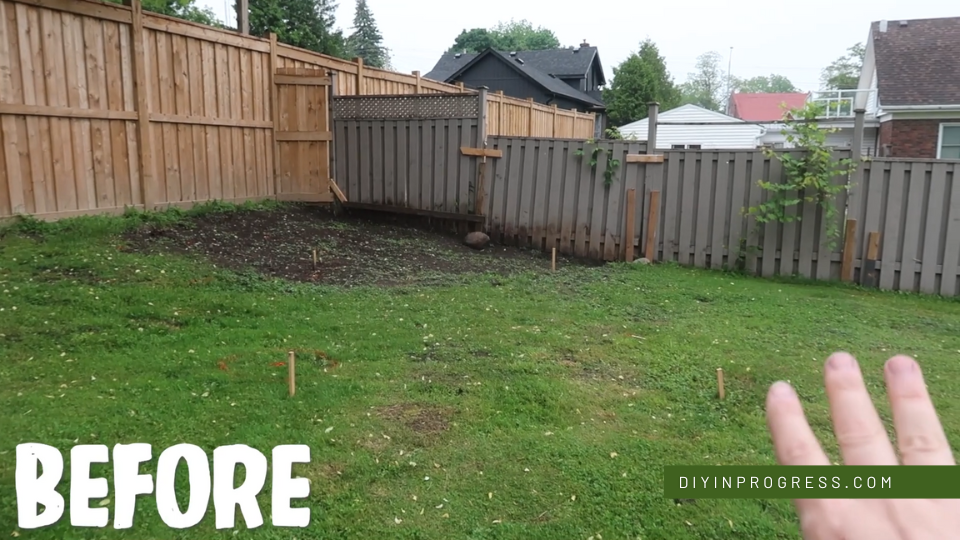
So, welcome to Part 1 - starting with nothing but a fool's dream to grow a single pepper in her backyard (and maybe a few other things too)!
Preparing To Build A Greenhouse!
I should begin by stating that in the planning stages we took all city bylaws and building codes into consideration. I highly recommend you go through this process with your own city bylaws so you don't get any nasty surprises later when your greenhouse structure is already built! With bylaws considered, we also built the greenhouse a few feet away from the fence so that we could easily get the lawn mower around it. Try and think of all the possible variables before you commit to a location.
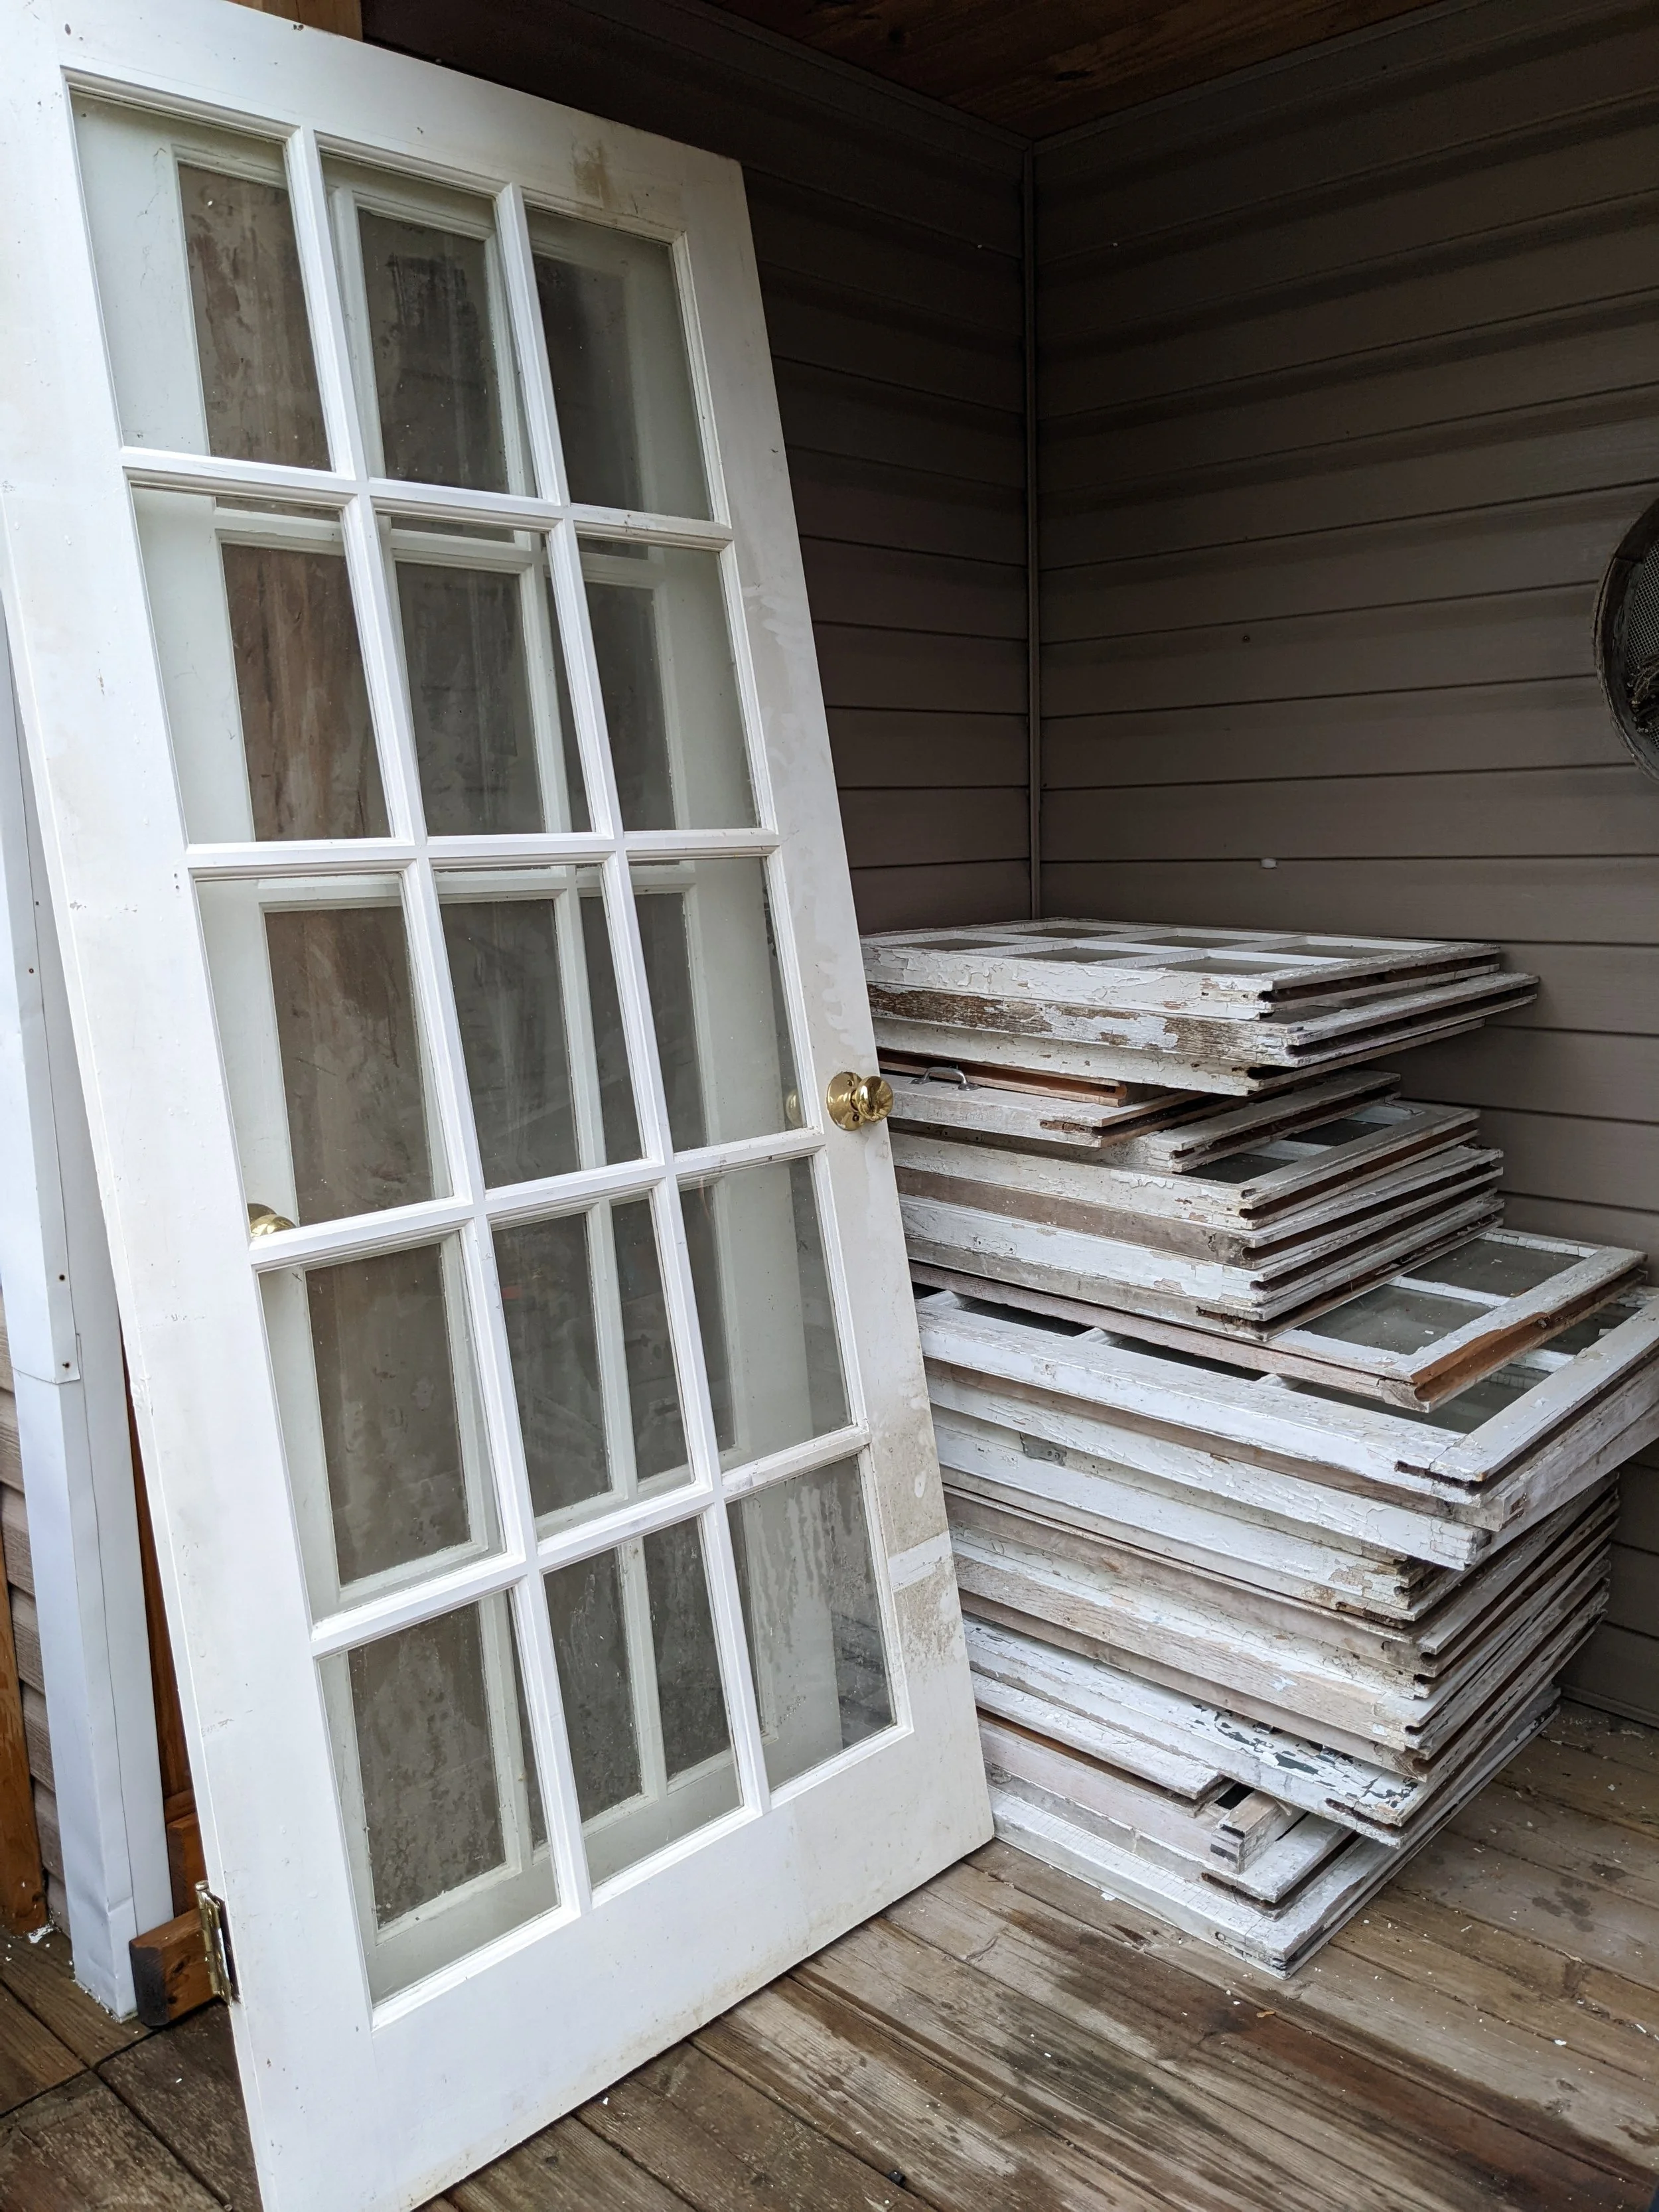
My goal was to keep costs down. I knew lumber was going to rack up quickly, so any materials I could source for cheap was a must! We had a door generously donated to our cause and I was given a pile of FREE antique windows by @willowanddovestudios (thanks again, so much).
The best place to look for cheap windows and doors is any online buy-and-sell site like Facebook Marketplace or Kijiji. Look for deals and be patient in this process!
What Do You Need to Frame a Greenhouse?
SUPPLIES
Limestone Screening (Approx. 1 Cubic Yard)
(17) 5/4” X 6” X 12” PT Deck Boards
(10) 2” X6” X 8’ PT
(2) 2” X 6” X 12’ PT
(15) 2” X 4” X 8” PT
(1) 2” X 6” X 12’ PT
(12) 1” x 6” x 8’ Fence Boards (PT)
(7) 2” x4” x 8’
Door (Ideally Second hand)
3” Deck Screws
3 1/4” Structural Screws or Nails
TOOLS
Level
Tamp
Shovels
Hammer
Can you frame a greenhouse with wood?
Absolutely! For the beginner (or even advanced) DIYer, wooden frames are definitely the easiest to work with but make sure you’re choosing the right wood for outdoor applications, such as pressure treated cedar. You can even purchase wooden frame structure kits online or there are aluminum frame greenhouses available too! If you’re not a savvy DIY guru, I’ve linked a few of my favourite below!
TMG Industrial 6’ x 12’ Crystal Clear Greenhouse, Aluminum Frame
AMERLIFE Hybrid Polycarbonate Greenhouse with Vent Window Lockable Hinged Door
Outsunny Polycarbonate Walk-in Garden Greenhouse - Clear - Hobby
How to prepare your backyard for a greenhouse
To build our foundation, we needed:
Limestone screening
6 Concrete deck blocks
Large Level
Measuring Tape
Landscape fabric
Shovels

The first thing we did was mark off the dimensions of the 8’ x 12’ greenhouse. We put stakes in the ground and added string to help see this frame. The goal was to level the ground. The land was quite sloped, so we had to remove a lot of dirt from the back and add it to the front . Levelling the ground was NOT fun but it’s really important to get this right because it will impact EVERYTHING in your greenhouse build. You may need to remove dirt or add dirt - but you keep working until the ground is level. Tamp the surface flat.

Once the ground was level, what we should have done was place our 6 deck blocks in each corner and sides of our frame. Originally, we planned to have a small step up into our greenhouse but upon seeing it, it made more sense to have the greenhouse be level with the ground. In the video diary, you’ll see us add the blocks later but what we should have done (which we ended up doing later and it was a terribly messy process), was recess the blocks into the dirt so that the tops were flush with the ground.
Should a greenhouse have a raised floor?
Honestly, it’s your choice! You can build your structure on top of the ground, you can build a wood floor, or build it on a more permanent structure like concrete! The foundation of your greenhouse can vary based on personal choice and local bylaw restrictions - make sure you do your research for your area. The choice is yours but regardless, the preparation is all the same!
For our greenhouse, I wanted the feel of a finished structure (a tiny home vibe), so we decided to build a raised wood floor. Whether you want your base built directly on the ground or a deck floor, you’ll want to make sure the ground is prepared so no weeds or grass can grow through. To do that, you’ll need landscape fabric.
Now that our 8x12 area was levelled and tamped, it was time to lay our the landscape fabric. Landscape fabric is a perforated material (it feels like a thin tarp or plastic sheeting) that allows water and moisture to reach the soil but stops any weeds/grass from growing through.

On top of the landscape fabric, we added limestone screening. My Dad used his lift trailer to drop the limestone on top of the fabric and serve as our base layer. You can also use a shovel for this process but why do that when you got a fancy trailer? We spread it around to cover the entire 8x12 area.
You can use different materials for your base such as pea gravel or concrete but we chose a thin layer of limestone because it’s super strong but porous, which means it has good drainage. Also, my dad already had some he was willing to give me!
In the video diary, this is when we placed our corner deck blocks on top of paver stones - if you want to step up into your greenhouse, this option is totally fine. But I realized after that we wanted it level with the ground. So, make sure you are sure about your plan ahead of time! Sigh.
How To Build A Wood floor On Top Of Deck Blocks
Whether your blocks are recessed or elevated on top of paver stones, the next step is all the same. We added (6) 4x4 pressure treated cedar posts into the deck block cavities, and secured them in place with (2) 12' x 6” x 2” and (2) 8' x 6” x 2” pressure treated lumber. As we secured each post, we made sure to level them to ensure they were straight. If you’re looking for more step-by-step detailed instructions (with materials) I have a full step-by-step guide you can purchase here!

Not related to the base, but we did the same thing at the top, this time using 2x4 PT instead.
Inside the frame, we secured (8) 8' x 6” x 2” floor joists, which was a breeze with two people! Pro tip from my dad: add the screws into the board at the measured lengths ahead of time so you can quickly finish screwing them into place once the joist is ready to go without messing around holding it for too long.

To make it into a proper looking floor, we added (17) 6” x 12” deck boards using a ½” thick screwdriver at each end and between each board for consistent spacing. (I used a jig saw to cut the end boards to fit around the posts.)

BUILDING OUR GENERAL ROOF STRUCTURE
Now that the floor was finished (yay!), it was time to build our roof! We needed to add our ridge beam. This is basically the spine of the roof. To figure out where exactly it needed to go, we had to know the height of the roof (aka the ROOF PEAK). I knew I wanted to frame a stain glass window over my door, so I placed the window on the ground, added 2x4s around it and measured from the bottom middle of the window to the top peak of the triangle - this helped me know how tall I needed the roof to be to allow this decorative element. For me, my height was 3ft.

We added a 2x4 brace in the middle between the (2) middle 4x4 posts (this got removed later). From there, we put up three placeholder 2x4 beams vertically across the three braces at the top, then secured our ridge beam to that.
Once the ridge beam was up, it was time to add the rafters! we cut (15) pieces of 2x4x8 lumber. The top of each rafter was angled to lay flush with the side of our ridge beam. We cut a notch, also known as a bird's mouth, where the rafter will rest on the wall. You can achieve this by either match-marking the board (aligning it and marking with a pencil) or by using an online calculator.
https://www.mycarpentry.com/roof-pitch-calculator.html
Using a jigsaw, we cut out the birds-mouth notch and secured each rafter at the ridge beam and at the wall plate (header). We Installed 7 rafters per side, spacing each rafter 24 inches apart on center.
For additional support, we utilized 2x4 scraps to construct collar ties that were secured across the left and right rafters. We placed them on every other rafter pair. These ties prevent your rafters from spreading under load.
Let’s add the Purlins!
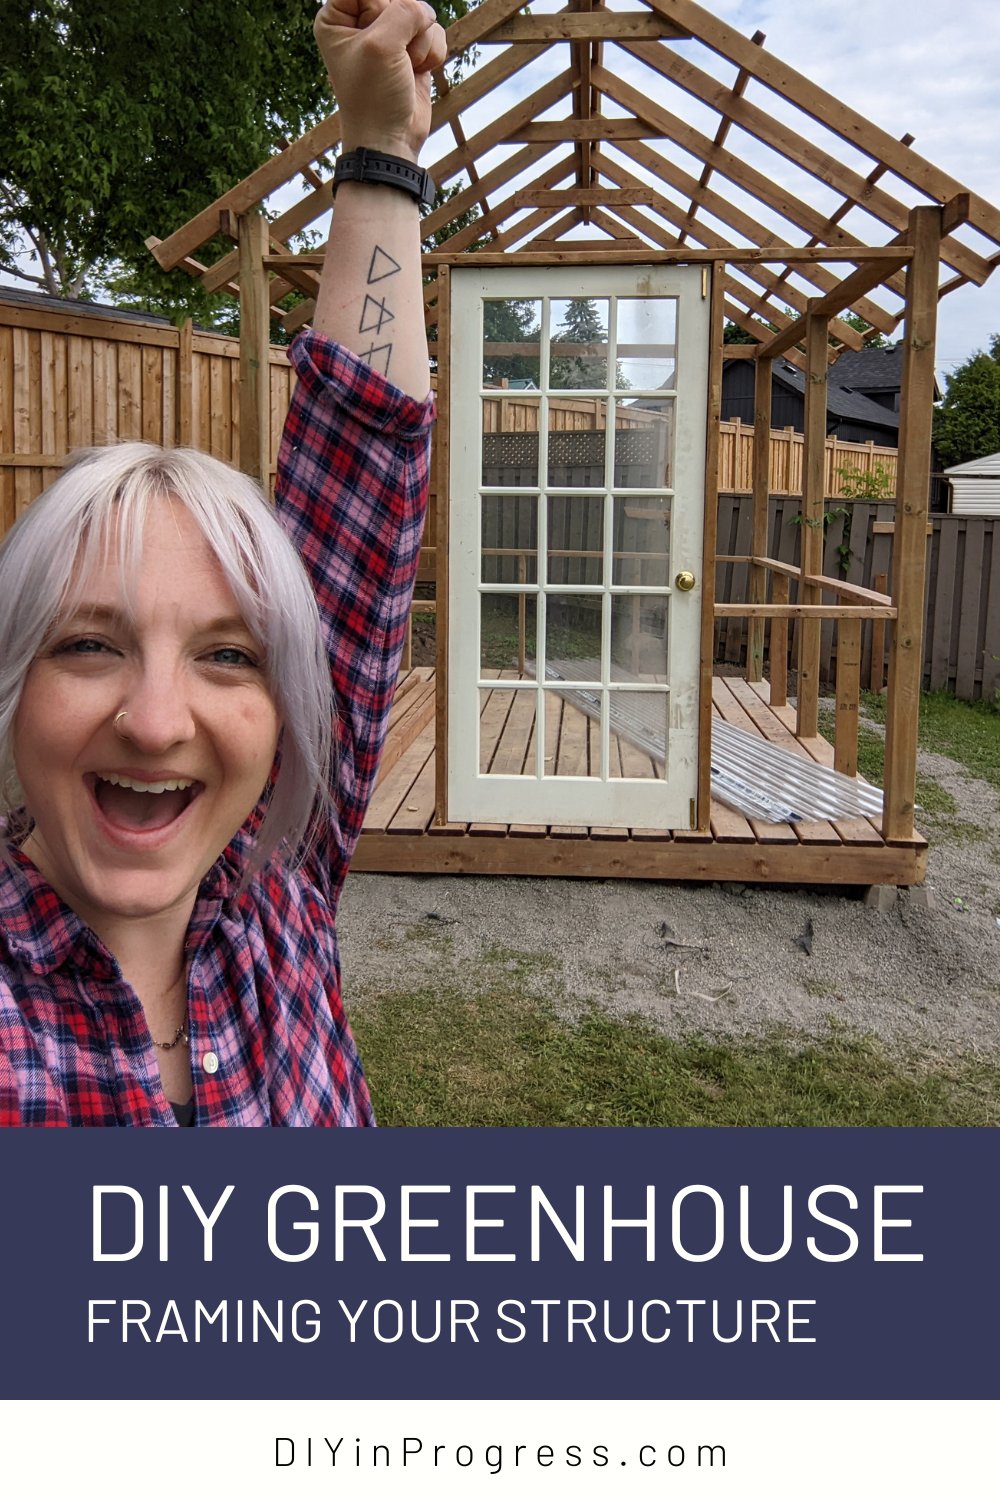
Now we had the basic structure of our roof, it was time to add 2x2 pressure-treated purlins. These run the same direction as the ridge beam and support the roof. They are also the part of the structure where we will attach our eventual corrugated plastic rooftop. We installed a total of 4 purlins per side: one at the top, one at the bottom, and two in the middle, spaced 24 inches apart on center.
Adding A Door And Wall Supports
The construction of the walls can be a matter of personal design preference! You might opt for all walls made from windows, or follow my approach with half of the walls crafted from horizontal wood boards and the upper half from reclaimed windows. Whatever you decide, enjoy the process and let your creativity shine!
First off, we wanted to add our door. We measured the height of our door. Added an additional 1/2 inch, marked this height inside our front 4x4 posts and secured (1) 2”x4”x8’ horizontally above that marked line. This served as the top of our door frame. The extra 1/2 inch ensured your door had enough clearance to open without hitting the ground. Once this was secured, we removed the lateral support across the front as it wasn’t needed anymore!
From there, we measured the width of our door. We marked the center of our 8 ft GH (ie 4 ft), then ceneterd our door on this mark and secured (2) 2x4 posts outside our door measurement and screw them to the base and top plate we previously secured. Quick note: leave an additional 1/4” to 1/2” to ensure the door isn't too tight.
Now that walls were going up, I wanted additional support between each 4x4 post. So I used 2x4 posts to reinforce the structure and provide support for the windows I planned to install later. I placed one between each 4x4 post and two in the back.
We decided to make our half walls run 30.5'“ high, which was (6) 1 x 6 x 8 fence boards high for visual balance. Starting at the door frame, I measured my desired height from the base and secure a horizontal 2x4 between each post above this measurement. I then repeated this process around my entire structure!

And that's it: the end of Part 1! Never in my life did I think I would be building a tiny greenhouse on my property - it’s been so much work already but so rewarding and fulfilling in every way!
Next, I’ll walk you through the next steps of this greenhouse build, including installing the windows and more!

As always my friends, stay positive, stay creative, love your magic, and keep on DIYing!