
DIY Industrial Wood Beam Chandelier 💡
If you're a fan of rustic industrial style furniture like me, than this DIY Industrial Wood Beam Chandelier will check all the creative boxes! ✔ With it's warm wood tones, cool black industrial accents and exposed vintage bulbs - it's the perfect eye-catching conversation piece in any home. This project is probably one of my favorite DIYs I've tackled to date. It required so many different moving parts that kept the entire build interesting and fun to put together! 💡
This DIY diary is part 3 to my 3-part DIY adventure with Fusion Mineral Paint owner Jennylyn who asked me to help makeover her office space with some DIY love. My first video, I made over her old rusty radiator into a beautiful bright pink ombre splash of art, the second project I tackled a cool live edge industrial table with ombre epoxy resin channels. Today’s is a really friggin cool one - I’m creating a custom Industrial Wood Beam Chandelier using a reclaimed barn beam and all I can say is… it’s B-E-A-U-T-I-FUL.
WATCH FULL VIDEO DIARY BELOW!
SPECIAL PROJECT MATERIALS:
Reclaimed Barn Beam - Sourced from Buy and Sell Website.
5 Pound Wedge - https://amzn.to/376ozDg
Large Hammer - https://amzn.to/2NM5xKK
Drill - https://amzn.to/2NzWOKv
Clamps - https://amzn.to/31YndXe
Planer - https://amzn.to/354uabe
Orbital Sander - https://amzn.to/2MZ3H94
80-Grit Sandpaper - https://amzn.to/2NLYxgR
Cotton Rags - https://amzn.to/34VS3BU
Sheen Polyurethane Finish - https://amzn.to/2NOD0nN
Tapered Brush - https://amzn.to/32PAPoh
220 - Grit Sandpaper - https://amzn.to/354DKuG
Plastic Gloves - https://amzn.to/2Kl5Vxt
1/8" Steel Plate - http://bit.ly/2XhC4LR
Vice - https://amzn.to/2Ogt3yq
Metal Punch - https://amzn.to/2OcaDPv
¼” Drill Bit
11/64” Drill bit
Black Matte Spray Paint
Electrical Box
Top Plate
1" Metal Hole Saw - https://amzn.to/3524GeB
(5) Conduit Connectors - https://amzn.to/32Pz7TZ
5 Merets - https://amzn.to/2Kp10f9
4 Jumpers (2 neutral, 2 hot)
Wire Strippers - https://amzn.to/2KpvUE5
12 Gauge Wire (2 wire + ground)
12 Head Spider Pendant Lighting Chandelier - https://amzn.to/2rMCxtN
12 Edison Bulbs - https://amzn.to/2CQBOtD
(4) Bow Shackles - https://amzn.to/2OcleKd
(2) - 5 gauge decorative solid steel fixture chain @ 3ft - https://amzn.to/359zgDn
1-Pack Heavy Duty Swing Hook - https://amzn.to/3583O8b
*Please note these links are affiliate links!
Step 1: SOURCE A BARN BEAM. I literally had no clue where to start when looking for a barn beam. You either know a guy or you don't. I didn't. Luckily, we live in a world of buy and sell websites and I came across a beam that looked in pretty decent shape!
This beam was 9$ per foot for a 6 Foot Beam.
TOTAL COST: $54 bucks
Step 2: IT'S TIME TO SPLIT. This was my favorite part of this DIY. I needed to split the beam, as it was obviously too big and unusable in some areas. Using a weighted splitting wedge and a hammer, I got ready to split this beam wide open!
To split this properly, I had to determine the section of the beam that I wanted to preserve. The section i wanted was already naturally splitting off of the main beam so I was in luck!
I was able to wedge the splitting wedge into the open cracks and hammer it down slowly taking a few moments in between each hit to listen for the natural cracking of the board.
It was best to let nature do the work vs forcing it to crack open.
Once the cracking would stop, I just continued to work down the board.
Ideally, I would have loved this beam to be a bit thicker. I had a vision of it being larger, that way I could have the option to carve out a top section of the beam to place in my electrical box… but with the beam I sourced, I had to be practical, and this was the best course of action.
Step 3: SPLITS ARE ROUGH. All the sides were looking pretty rough from the natural splitting, so I decided to take a planer to the sides to help bring out it's true beauty underneath.
I set my planer to 1/8th of an inch and got planing.
Once I was done planing, I cut the end of my beam to make it 5 inches.
My final board was: 5" x 3.5” x 3.5”.
Step 4: SMOOTH TALKER. I sanded the beam smooth using a 80 grit sandpaper with my orbital sander. This removed any splintered edges and roughness. The point of this wasn’t to remove the character, but just take out the icky parts.
I mean...call this beam Sandra Bullock because it was winning the Miss Congeniality award!
Step 5: The board was looking beautiful but I certainly wanted to give it a darker look so I stained the board a warm brown tone.
Step 6: TALK ELECTRICAL TO ME. I needed 12 industrial style pendant lights to create the look I was going for. Sourcing 12 individual pendant lights would have been very pricey. To offset this cost, I purchased an inexpensive pendant spider-light that came with 12 arms. My plan was to hack it. 😬
DIY Electrical Box: The main connection box that came with the spider light was far too large to fit on my beam (or in it), so I sourced a small electrical box from my local hardware store. Let me level with you...in an ideal world, I should have sourced a larger barn beam, so that I could bore a hole in the top of the beam to hide my electrical box inside. However, with the natural splits in my beam, I was forced to make it smaller. Thus my beam was too small + thin to do something of this nature, so I had to source the smallest (most discreet) electrical box I could find.
Once I had my electrical box, I removed the knockout sections on each side and attached 4 conduit connectors inside the knockouts. The connectors would allow the cords to travel into the electrical box and hold them in place.
To create my lid for my electrical box, I purchased a metal top plate in the same size of the box. The lid needed a hole to allow the main electrical line to leave the box. Of course, they dont sell a plate with a hole in the middle, so I created a hole on my plate using a 1" metal hole saw.
After that, I spray painted everything in a matte black.
PLEASE NOTE: I AM NOT AN ELECTRICIAN BUT I UNDERSTAND THE SAFETY NEEDS AROUND ELECTRICAL WIRES. IF YOU HAVE NEVER DONE THIS BEFORE, HAVE A PROFESSIONAL ON HAND OR SEEK HELP TO MAKE SURE YOU CONNECT YOUR WIRES PROPERLY.
Connecting The Wires: Using wire strippers, I removed the black rubber casing from all 12 ends of my pendant lights to reveal the two hot and neutral wiring underneath.
Basically, under most electrical cords, there is a HOT wire (normally represented as a black or blue wire) and a NEUTRAL wire (normally represented as a white or orange wire). This isn't always the represented color conventions, but 9/10 times, it is.
Using the wire strippers, I removed about 1" of blue and orange plastic tubing around each hot and neutral wire to reveal the copper wires underneath.
Once I had all twelve stripped, I grouped the pendant cords into 4 sections of 3 and slid each section through my metal conduit connectors into the box frame. Tighten down using the clamp on the conduit.
What I had at this point was something that looked like a hot mess! Don't panic - it looks worse than it is.
I took all the hot wires (black or blue) on the left side of the electrical box and twisted them together. I then took all the neutral wires (white or orange) on the left side of the electrical box and twisted them together. Now it was time for my jumpers.
Basically, when you have a bigillion wires (yes, i know that's not a word) like I did, you want to condense these wires together so that only ONE wire is connecting to your main electrical line vs 6. I had 4 jumpers in total. Two for my hot wires, two for my neutral wires. So I took 6 blue wires and one HOT jumper, twisted them together at one end and added a meret on top to keep it together. Repeat this for the neutral wire on the left and both the Hot and Neutral wires on the right side of the box.
When I was finished, I had 2 HOT jumpers and 2 NEUTRAL jumpers ready to attach to my external electrical line.
Last step was to attach the external cable wire (the one you’re going to see coming out of the box) to the wiring I just did inside the box. I had to feed my external wire through the top plate of my electrical box then expose the hot, neutral and ground wire inside. The ground wire usually looks like a copper wire. Then I simply took all my neutral wires and mereted them together, and all my hot wires and meretted those together. I left my ground line exposed. You’ll need this later when you're ready to attach to your beam.
THAT'S IT. That was a tad complicated to explain in written form but hopefully that made some sense?! 🤷♀️
Step 7: BEAM ME UP SCOTTY! As a last step to my beam, I added a semi-sheen poly top coat to give it some protection and I like the way the sheen makes it feel a little more classy.
Step 8: WHAT A STEEL. To support my beam from the ceiling, I sourced a ¼” steel bar that I bent around the beam to create a beautiful industrial brace.
I decided which part of the beam I wanted facing upwards, measured in 6” marked it off with tape, then measured all sides around at that 6” mark to ensure I had all the information I needed for general length.
Essentially I had to account for the bend radius so I added an extra 1/8th of an inch of the measurements to account for that.
To bend the steel, I placed the bar in a vice at particular bend points then used a big hammer to bend/ smash it in place.
Using a reciprocating saw and a metal blade, I cut the steel down to the size I needed. I left about 1" of extra steel hanging over the top to play with for attaching my metal chain later.
Boy, call me god of thunder because I was wielding that hammer so good!!!
On each brace, I created two holes on each side. One at the halfway point to act as a pin hole to avoid the frame from sliding on the beam, and one 1/2" from the top to connect my bow shackles. I dented the steel at my marked points using a punch and pre-drilled a ¼” hole. Then I drilled a larger hole using a 11/64” drill bit.
As a last step, I removed all the metal burs from the steel braces using sanding paper and made sure there were no sharp edges that you could hurt yourself with. I also sanded the surface of the steel to scuff it up so that I could spray paint everything black. By scuffing the surface, I am giving something for the spray paint to grab onto.
Step 9: BRING IT ALL TOGETHER. I attached the two metal braces that were now a cool industrial black. I simply just squeezed it tight using clamps, then secured it using the set screw holes I made before.
I repeated this for both sides then moved onto attaching that electrical box.
First, I screwed on the bottom attachment plate and screwed on my exposed ground line to the ground lug on the plate (usually represented as a green bolt). First step done. Using clamps, I held down the plate tight and attached my screws to the bottom plate. Last step, I added on the top plate and BAM!
I did need to clean it up a little with spray paint, but all in all, I think it really turned out!
Step 10: CHAINS, CHAINS, CHAINS. I sourced industrial black chain off of amazon (thank goodness because it doesn’t exist anywhere in hardware stores) and i used a bow shackles to connect my chain to the two steel braces.
And like that, I had my entire DIY Industrial beam light completed!
AHHHH what a journey!
Step 11: BEAMING WITH DELIGHT! To attach my beam light to the ceiling, I sourced a heavy duty swing hook that I spray painted black. I went heavy duty because I wasn't messing around folks! The entire beam was about 35 pounds in total.
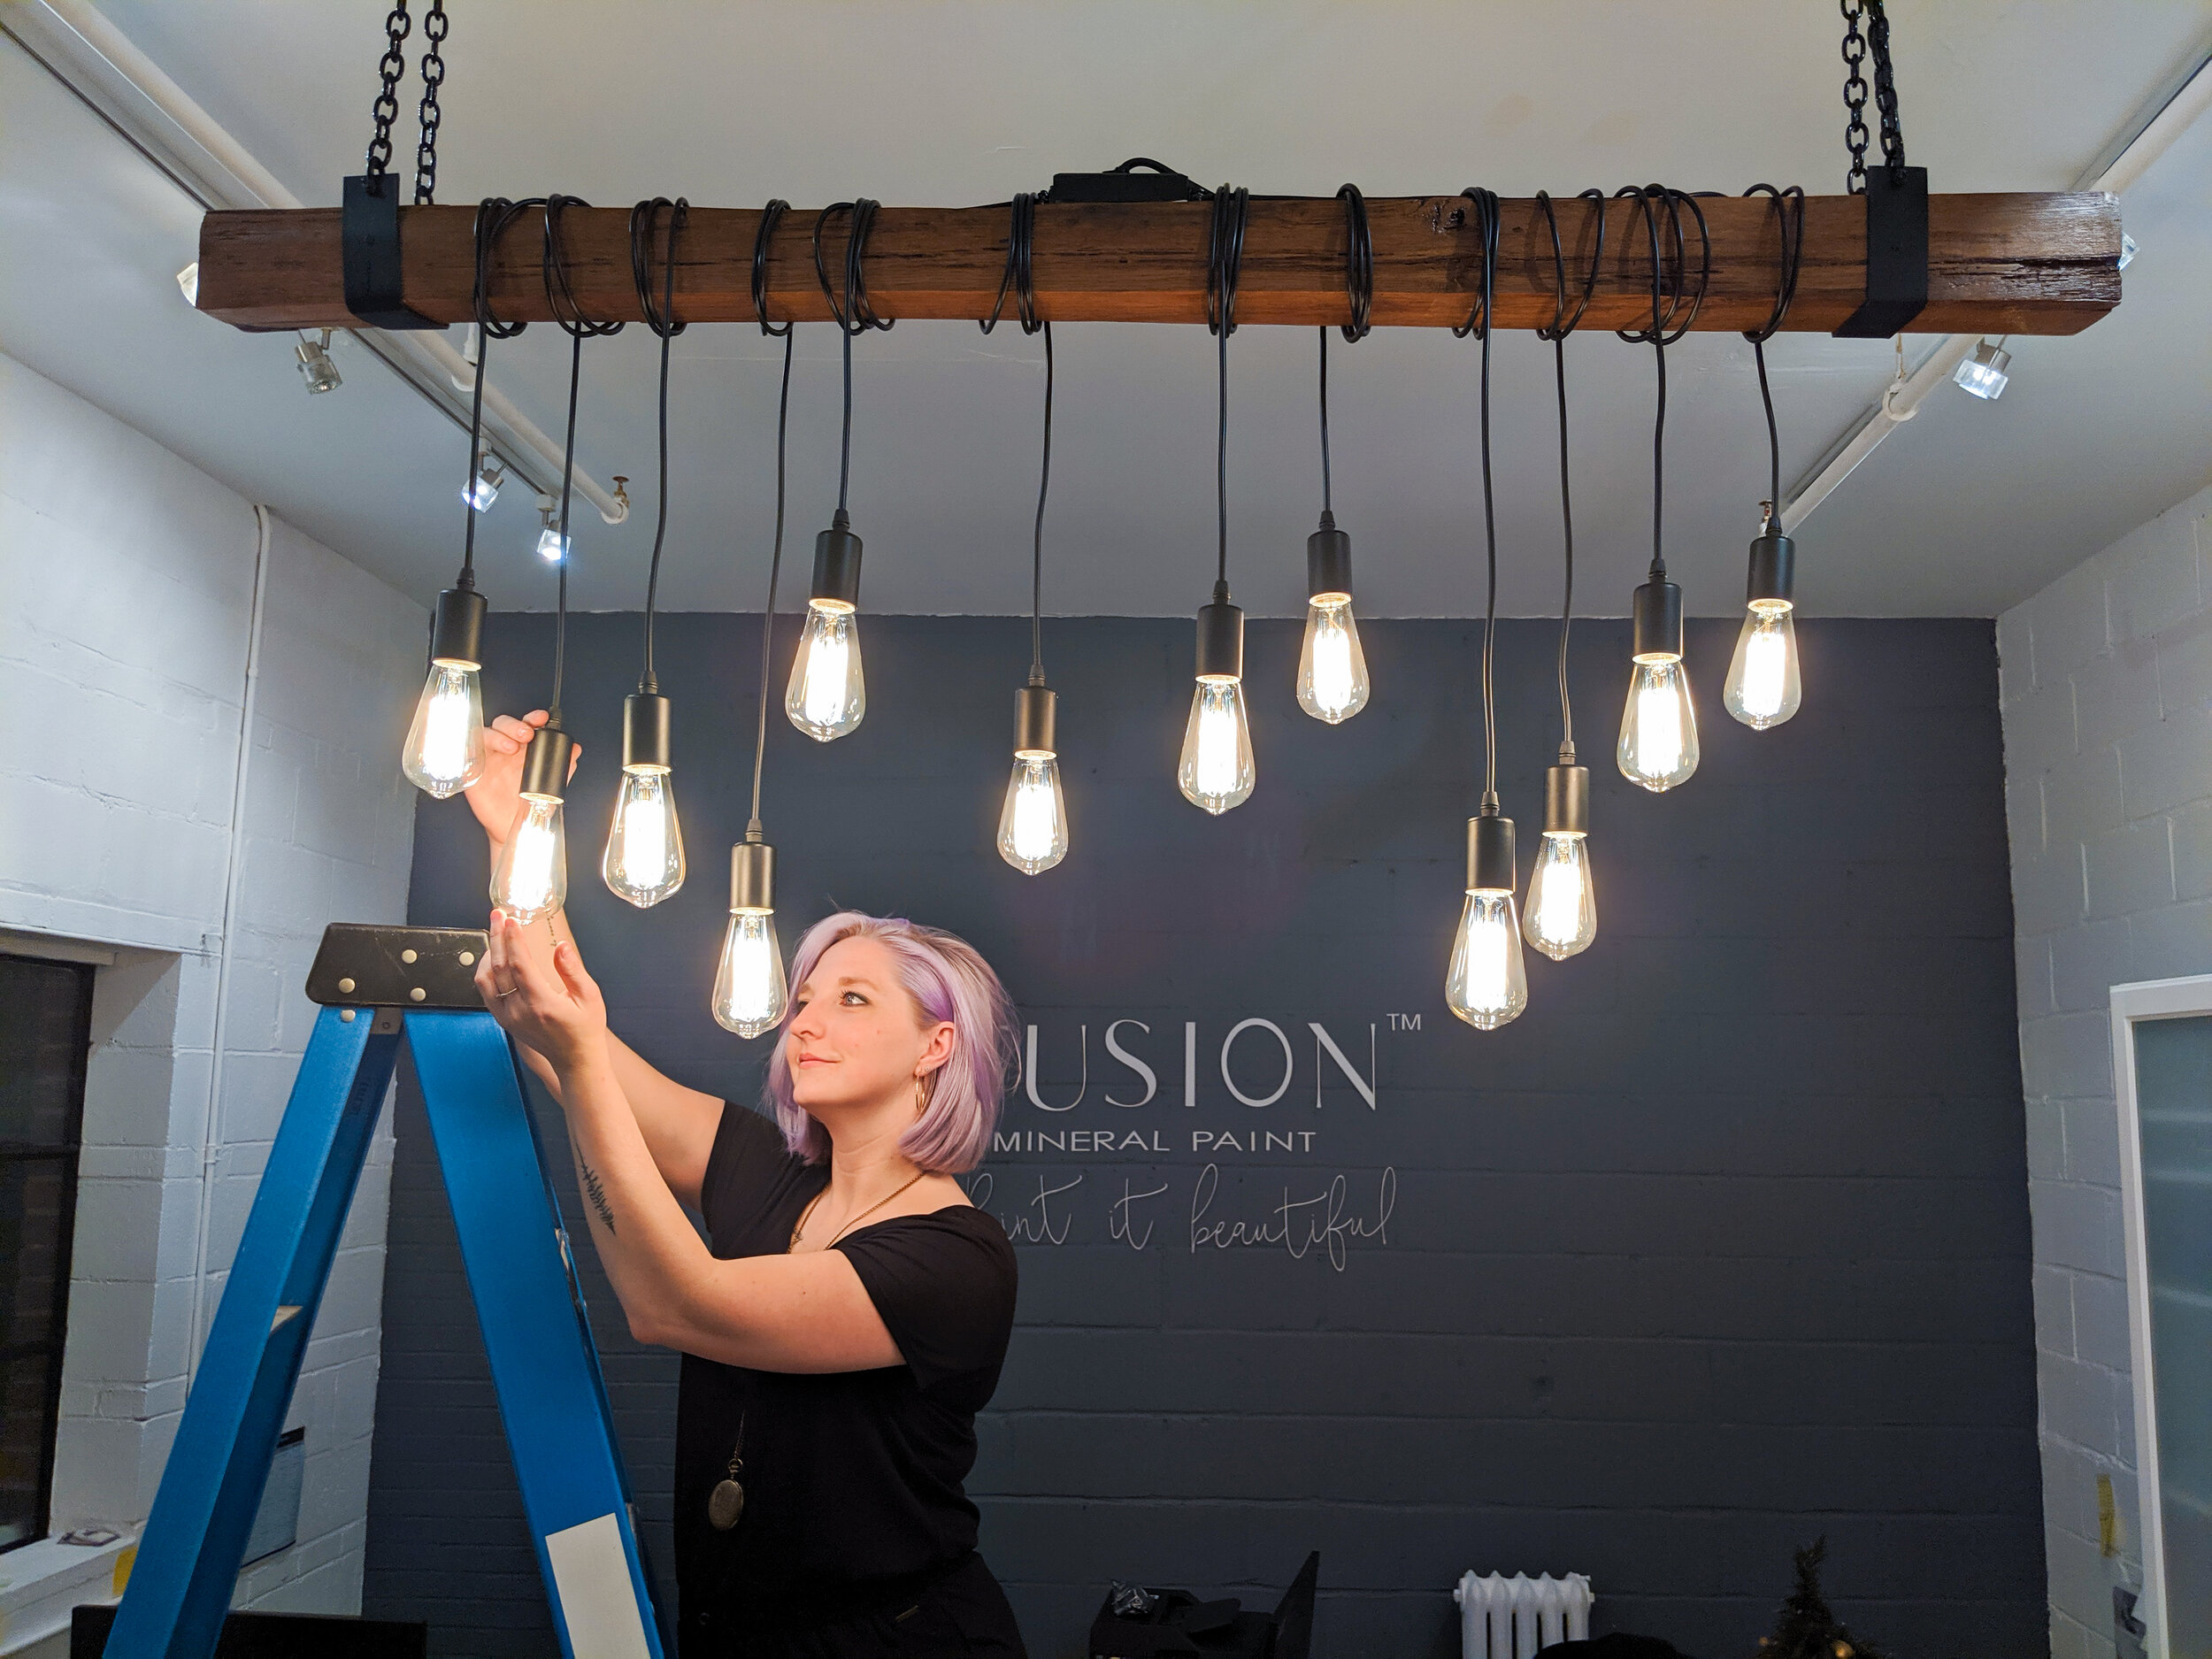
Wrapping the lights took a bit of patience, but I found the best look was to alternate the cord direction from side to side and vary the heights.
Last step was to add my vintage bulbs!!!! 💡💡💡💡💡💡💡💡💡💡💡💡


All in all, this DIY Industrial Wood Beam Chandelier looked CRAZY beautiful hanging off the ceiling. The industrial aesthetic of the beam complimented the industrial office style. Honestly, the photos and video really didn't do it justice in regards to showing off it's true beauty! The natural wood looked so polished and warmed up the room, especially paired with the dark blue accent wall behind it. The black industrial metal accents played nicely off the live edge table legs sitting underneath. It was such a conversation piece when you walk in the room and framed the beautiful Fusion Mineral Sign on the wall beautifully.

WATCH THE FULL DIY DIARY HERE:
* PLEASE NOTE THIS BLOG CONTAINS AFFILIATE LINKS FROM AMAZON US.