
Laundry sorting just got a little more beautiful
Dear Diy Diary,
I gotta say, I was a little shocked by my lack of general "laundry sorting care" routines. I was a person who sorted my laundry in two categories: CAN GO IN DRYER / CAN'T GO IN DRYER...and the occasional whites/delicates load. Meeting Karen (my laundry sorting client), opened my eyes to bigger possibilities of better clothing care in our home.
The biggest challenge we face in laundry organization is that, laundry bins that cater to several sorting selections are just...kinda ugly. Most home stores offer 6-bin organizers made of plastic and poorly made mesh bags. Beyond that, if you want a cuter option, you either have to invest in several wicker baskets (pricey) or custom graphic bags (again, pricey). 9 times out of 10, they are open facing and take up a lot of real-estate!
Karen went on a hunt looking to purchase the perfect laundry sorting cabinet that would cater to her laundry sorting needs of: WHITE, COLOURS, DARKS, PJ's, SOCKS, DELICATES, TOWELS - She loved the tilt out versions from etsy, however, most custom solutions only offered two or three bin sorting options and that simply was not going to cut it!
This was a job for DIY Danie!

It was clear to me that Karen was not afraid of colour. Her bedroom was painted a beautiful rich purple, office was lime green, and her furniture accents were primary red. Beyond that, all the decor accents were white and silver. I could work with that!
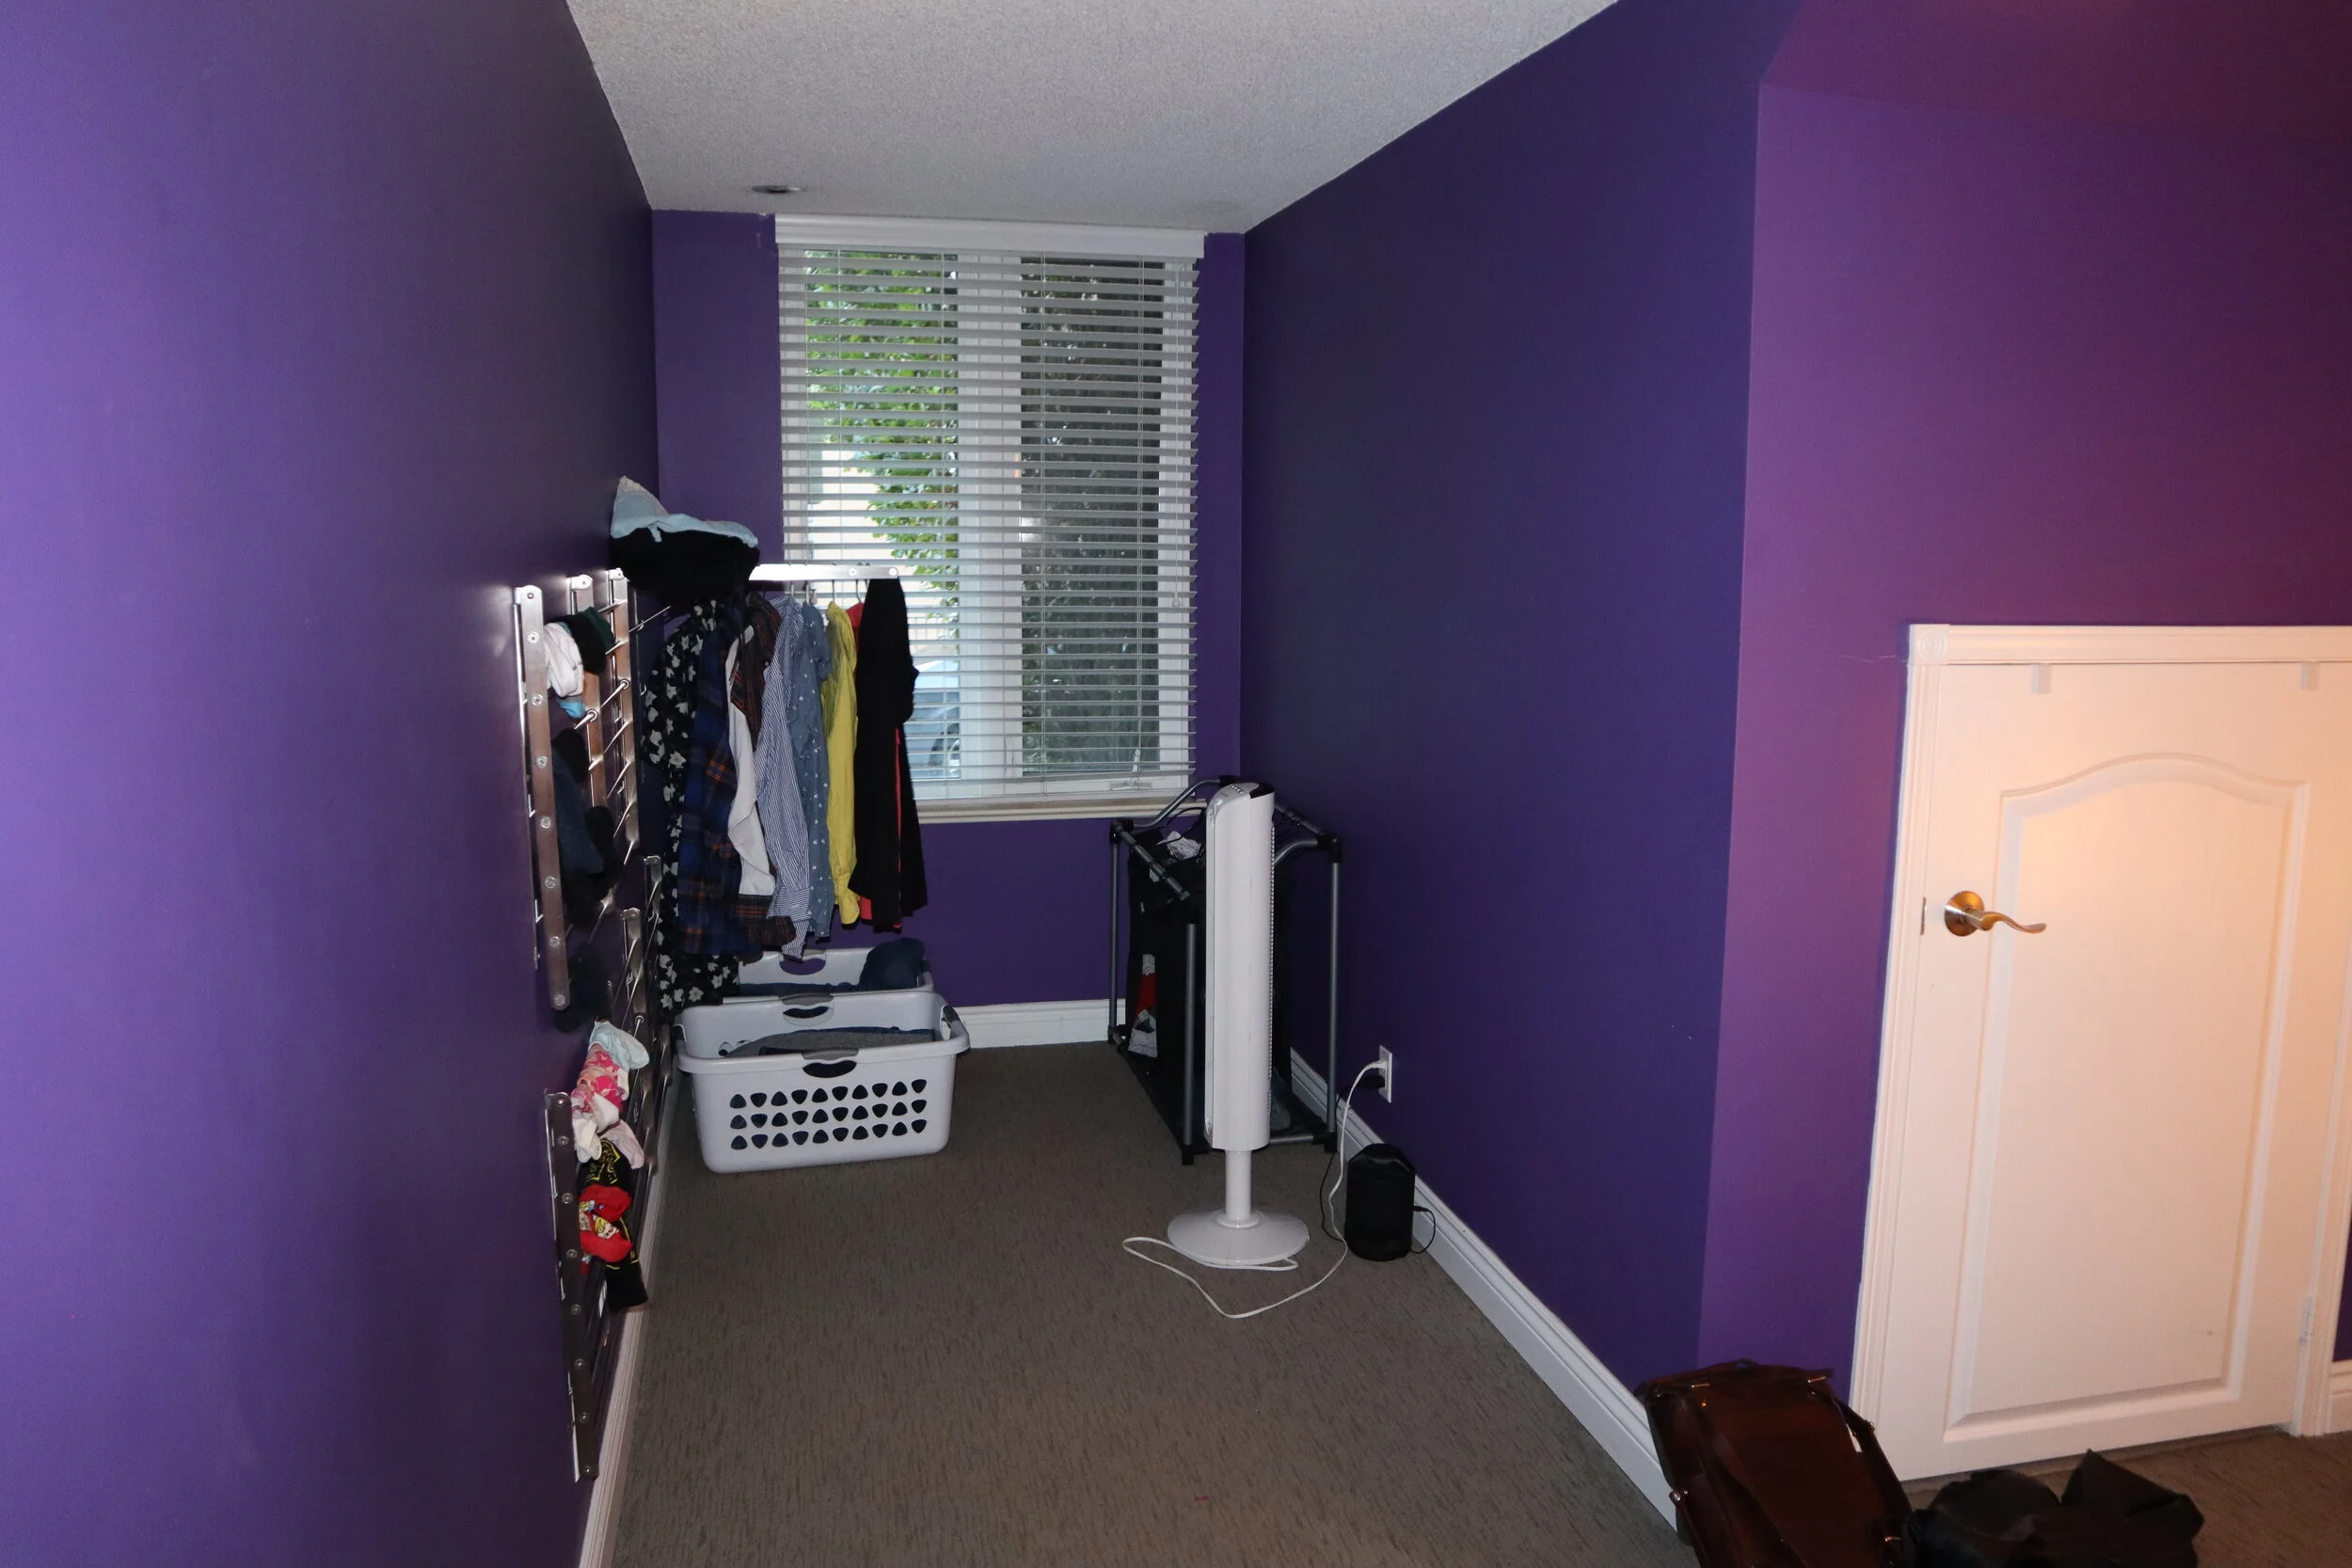
Karen's bedroom space had a small nook that was completely dedicated to her laundry sorting needs. She had 6 wall mounted drying racks on one side, and a plastic 6 bag laundry sorter on the other. Having the window in this nook, this space was the first thing you looked at when you walked into the bedroom...and it wasn't pretty.
THE BEFORE:
First off, this piece needed to be thin. I also knew I couldn't create 7 bins, as there simply wasn't enough length along the right side of the wall. Instead, I came up with a plan to condense the cabinet to 5 and organize them like this:

I knew the delicates and socks wouldn't need a lot of room, so by splitting the fifth cabinet in half, I could easily fit two small laundry bags inside.
Of course... it wasn't just about the laundry solution that was going to save this space. Looking at this nook, it needed more function and personality. To do this, I wanted to add two floating shelves above the unit with beautiful wicker baskets to hold socks and delicates. I then wanted to add a large weave basket in the corner for folded laundry and towels. To add personality, I would add a little warmth and ambiance by placing a bamboo tree in the corner (faux, as requested by Karen) and a modern table lamp.
This corner was finally looking like a space Karen could feel happy about!

TIP: Creating a mood board will help you visualize if all the items you love will work together in a space!

WOOD CUT LIST:
(2) PLYWOOD - 3/4" aspen plywood
5 @ 17 x 29 (cabinet doors)
1 @ 11 x 87 (cabinet top)
1 @ 10 x 83.5 (cabinet bottom)
2 @ 30 x 10 (cabinet sides)
5 @ 9 x 15 (tilt out door floor)
(2) 1x2x96 Lumber
4 @ 26 3/4 (cabinet front uprights)
(8) 1x3x96 Lumber
10 @ 9" (door frame sides)
10 @ 21 3/4" (door frame uprights)
5 @ 13.5" (door frame back)
3 @ 26 3/4" (cabinet back uprights)
3 @ 8.5" (internal cabinet frame sides + middle support)
2 @ 83.5" (top cabinet frame front + back)
1 @ 8.25" (5th door divider for double bag)
(7) Fiberboard Moulding 3/8 In. x 2-1/8 In. x 7 Ft.
10 @ 17" (cut at 45 degree mitre)
10 @ 29" (cut at 45 degree mitre)
MATERIALS: *please note, these are affiliate links!
Drill - https://amzn.to/2NzWOKv
Kreg Jig Set - https://amzn.to/2qUJXuA
Measuring tape - https://amzn.to/2RLsSNu
1 1/4" Pocket hole Screws - https://amzn.to/2GuSoBv
1 1/4" wood screws
Wood Glue - https://amzn.to/2MXSzsS
Clamps - https://amzn.to/31YndXe
Mitre box and hand saw - https://amzn.to/2uuoCd2
Brad Nailer - https://amzn.to/34aJ0fT
1" brad nails - https://amzn.to/2BWyIDW
Black Pull Handles - https://amzn.to/2RNj2dJ
20 small t-cup hooks - https://amzn.to/2RJarsO
(3) 1/8 x 48-inch Steel Round Rods
(8) black hooks - https://amzn.to/2tOHDXE
Metal Blade Hand Saw - https://amzn.to/2tNTPrH
(4) Laundry Bags - https://amzn.to/36oF4J4
(2) Laundry Sacs - https://amzn.to/2vdpjb6
(5) Heavy Duty Metal Ball Latches
(5) Steel Mending plates - https://amzn.to/3aFn9Bi
(6) Tapered Wood Legs - https://amzn.to/2TT2TWU
BUILD SCHEMATICS:


Step 1: Cut all lumber to size according to cut list outlined above. Have your local hardware store help cut the plywood pieces to save you time and mess! Especially if your space is small like mine!
Step 2: Start by building your top internal frame. Before securing together, also create pocket holes along the inside top of both 83.5" pieces. These will be used to secure your cabinet top to the frame later. Secure sides and inside frame first, than secure last 83.5 piece.

Step 3: Secure uprights to top frame.

Step 4: Using pocket holes, secure plywood cabinet sides, top and bottom to frame.
Step 5: Build cabinet doors.
5a) start by creating the door frame first. The only change in my design I made from the schematics outlined above was moving the two 21 3/4 uprights forward by 5/8th of an inch to avoid screws hitting each other. I secured the top and bottom pieces using regular wood screws and used pocket holes for the top of my uprights.

5b) Secure door fronts to door frames. Follow the schematic drawing above for placement. To secure, drill small pilot holes using a 1/8" drill bit through the front of the door into the frame and attach with 1 1/4" wood screws. I secured with screws from the front as my door mouldings would cover these screws later.
Step 6: Fit doors into cabinet cavities to ensure everything fits properly! Cross fingers!
Step 7: Using your mitre box and hand saw, saw your moulding pieces at 45 degrees and secure onto front of doors using wood glue and brad nail with 1" nails. If there are any small imperfections, simply apply wood filler to those areas.
Step 8: Give the whole piece a light sand using a 120-grit sandpaper.
Step 9: Edge Banding! Edge banding is something you use to cover plywood edges to give your piece a really professional looking edge. I love edge banding, I always think everything looks better once those nasty plywood edges are gone - and it’s really easy! You simply apply it on with an iron, use a straight edge to slice away any unneeded overhang and voila! There are different types of banding out there depending on the wood type you are using, so make sure you use the one that's right for you! and YES, you can stain edge banding.
Now, you’re probably thinking, why are you edge banding if you’re planning on painting over the piece anyways? Plywood edges usually have imperfections and voids that can be icky if you paint over it, so to avoid that look, you can two things - cover the edges with edge banding or spackle the edges to fill it in. I had edge banding left over from a former project, so I decided to go with that route but either way works.
I didn’t have enough edge banding to cover the entire thing but I picked any edges that were outward facing.
Step 10: Paint! For my cabinet, I used Varathane ultra Matte White Chalk Paint and finished it with a clear matte top coat. Let Dry.
Step 11: Add your hardware. To start, I attached 3 small 1" hinges to the bottom of each door.
There are many routes you can take when choosing hardware for your doors. Magnets, latches, clips etc. Pick the ones that you feel the most confident and comfortable with. On my piece, I used a heavy duty ball latch.
Door Stopper: To ensure the cabinet had a natural stopping point when tilted out, I attached a small 3" metal plate to the back of the cabinet door frame. When the cabinet door was pulled out, the metal plate would hit the back of the cabinet frame, stopping it from falling any farther.
Step 12: Add your desired feet to the bottom of your cabinet. I sourced blonde tapered wood legs off of amazon. I loved these because they looked provided the right modern look to my cabinet.
I added 6 legs in total (2 on the left, 2 in the middle and 2 on the right).
Step 13: Secure cabinet to wall to ensure your piece will not tip over from weight. I suggest securing the piece in two separate places, ensuring you are securing to a stud in the wall. Simple furniture cables will not work for a piece this big as the weight of all the drawers open will tip it forward naturally. Secure using L brackets.
TOTAL COST: 542. 40 (not including tools)
TIME: 3.5 DAYS TOTAL ( within 8 hour evaluation)


